Creating web tiles in Microsoft Band

Introduction

You can create apps for your Microsoft Band which display information from a feed URL without writing a single line of code. These app tiles are known as Web Tiles for the Microsoft Band and they are fully managed by the Microsoft Health application which manages other settings of the band.

How it works

Web tiles are files with extension .webtile, they are just packages which contain the icon image and the manifest JSON file. The manifest file contains the information like title, author, description, feed URL, tile face and the tile formation data. The feed URL can be any JSON / Atom Pub service.

Go this URL: http://developer.microsoftband.com/WebTile/

Follow the instructions

  • Click Get Started and Accept the agreement (if you have time, please read it and explain me as well)
  • Select whether you want to create a single page tile / multi page tile – Single page tiles have one tile page and multi-page tiles can have up to 8 tile pages.
  • Also choose the appearance of the tile.
  • In the next screen enter the feed URL and drag & drop the values in the selected tile’s placeholders. See the below image.

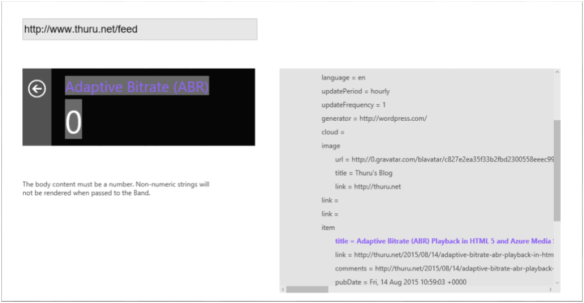
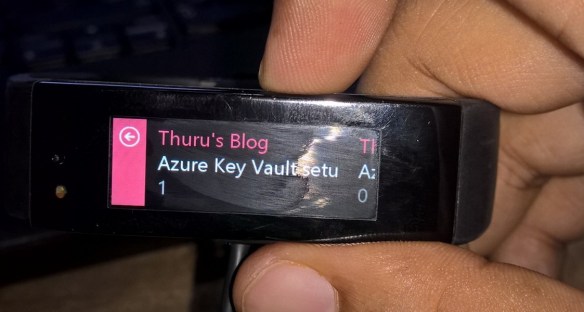
I have used my blog feed URL and dragged & dropped the post title and the number of comments in the tile face. (Note that the tile I selected is capable showing a text title and a number)

In the next screen you can specify the title, description author and other details along with the image for the tile.

Finalize the web tile and mail it, so you can directly download it in your phone. When you open the web tile in a Microsoft Health app installed phone, it will automatically detect and continue the setup.

But before jumping into the installation process let’s look into the web tile file.

.webtile file and manifest.json

As I mentioned above .webtile files are packages. Change the extension of the .webtile files to .zip, now you can extract the contents. Inside the package you will see a folder named icons where the tile icon file is stored and the manifest.json file.

The above image shows a portion of the manifest file. All the settings are saved here and you can configure more options in the file itself. Some parameters have default restrictions like the refresh interval cannot be set less than 15 minutes.

Installation

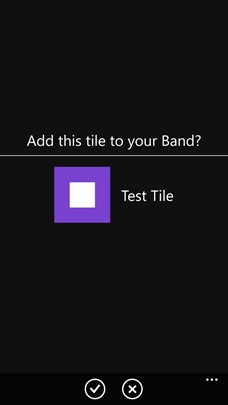
You can directly open the web tile in the phone which has Microsoft Health app installed. The tile will be managed by the app and you can uninstall it whenever you want. When you open the web tile, the Microsoft Health app will ask you whether to install it.

Now I can monitor the blog posts and the comment counts from my band.

Advertisement

Programming AGENT smart watch using C#.NET

Smart watch is one of the current buzz words these days. From a tweet I clicked this link.  A kickstarter project initiation, this is not the one of its kind but this attracted me because we can use .NET and C# to develop apps. The above link provides the tools you need in order to start developing the apps for AGENT. The AGENT SDK (version 0.2) provides a beta level emulator and Visual Studio project templates as well. SDK utilizes the .NET micro framework.

I created a 2 simple applications using the available AGENT project template.

AGENT Watch Application

This is a simple animated human skeleton and display some text on the screen.

   1: using Microsoft.SPOT;

   2: using Microsoft.SPOT.Hardware;

   3: using Microsoft.SPOT.Presentation;

   4: using Microsoft.SPOT.Presentation.Media;

   5: using System;

   6: using System.Threading;

   7:

   8: namespace AgentWatchApplication1

   9: {

  10:     public class Program

  11:     {

  12:         static Bitmap _display;

  13:

  14:         public static void Main()

  15:         {

  16:             // initialize display buffer

  17:             _display = new Bitmap(Bitmap.MaxWidth, Bitmap.MaxHeight);

  18:             Font fontNinaB = Resources.GetFont(Resources.FontResources.NinaB);

  19:

  20:             int index = 0;

  21:

  22:             while (true)

  23:             {

  24:                 _display.Clear();

  25:

  26:                 _display.DrawText("Thuru", fontNinaB, Color.White, 44, 2);

  27:

  28:                 _display.DrawEllipse(Color.White, 55, 40, 10, 10); // head

  29:                 _display.DrawLine(Color.White, 1, 55, 50, 55, 90); // body

  30:

  31:                 _display.DrawLine(Color.White, 1, 55, 90, 40, 100); // left leg

  32:                 _display.DrawLine(Color.White, 1, 55, 90, 70, 100); // right leg 

  33:

  34:

  35:                 if (index % 2 == 0)

  36:                 {

  37:                     _display.DrawLine(Color.White, 1, 55, 55, 40, 75); // left hand down

  38:                     _display.DrawLine(Color.White, 1, 55, 55, 70, 75); // right hand down

  39:                 }

  40:                 else

  41:                 {

  42:                     _display.DrawLine(Color.White, 1, 55, 55, 40, 50); // left hand up

  43:                     _display.DrawLine(Color.White, 1, 55, 55, 70, 50); // right hand up

  44:                 }

  45:

  46:                 _display.Flush();

  47:

  48:                 if (index == 100)

  49:                     index = 0;

  50:

  51:                 index++;

  52:

  53:                 Thread.Sleep(1000);

  54:

  55:             }

  56:         }

  57:

  58:     }

  59: }

Output

image image

AGENT Watch Face

This is based on the AGENT watch face. I edited the template code to show the updates every second.

   1: using Microsoft.SPOT;

   2: using Microsoft.SPOT.Hardware;

   3: using Microsoft.SPOT.Presentation;

   4: using Microsoft.SPOT.Presentation.Media;

   5: using System;

   6: using System.Threading;

   7:

   8: namespace AgentWatchFace1

   9: {

  10:     public class Program

  11:     {

  12:         static Bitmap _display;

  13:         static Timer _updateClockTimer;

  14:

  15:         public static void Main()

  16:         {

  17:             // initialize our display buffer

  18:             _display = new Bitmap(Bitmap.MaxWidth, Bitmap.MaxHeight);

  19:

  20:             // display the time immediately

  21:             UpdateTime(null);

  22:

  23:             // obtain the current time

  24:             DateTimeOffset currentTime = DateTimeOffset.Now;

  25:             // set up timer to refresh time every minute

  26:             TimeSpan dueTime = new TimeSpan(0, 0, 0, 0, 1000 - currentTime.Millisecond); // start timer at beginning of next minute

  27:             TimeSpan period = new TimeSpan(0, 0, 0, 1, 0); // update time every minute

  28:             _updateClockTimer = new Timer(UpdateTime, null, dueTime, period); // start our update timer

  29:

  30:             // go to sleep; time updates will happen automatically every minute

  31:             Thread.Sleep(Timeout.Infinite);

  32:         }

  33:

  34:         static void UpdateTime(object state)

  35:         {

  36:             // obtain the current time

  37:             DateTimeOffset currentTime = DateTimeOffset.Now;

  38:             // clear our display buffer

  39:             _display.Clear();

  40:

  41:             // add your watchface drawing code here

  42:             Font fontNinaB = Resources.GetFont(Resources.FontResources.NinaB);

  43:             _display.DrawText(currentTime.Hour.ToString("D2") + ":" + currentTime.Minute.ToString("D2") + ":"

  44:                 + currentTime.Second.ToString("D2"), fontNinaB, Color.White, 36, 58);

  45:

  46:             // flush the display buffer to the display

  47:             _display.Flush();

  48:         }

  49:

  50:     }

  51: }

Output

image