Setting up Office 365 for SharePoint App Development

This is fairly straight forward. Sign up for the Office 365 account for developers using this link. You can sign up for a 30 days free Office 365 account with the developer license.

Once you get the Office 365 environment, you can start developing apps for SharePoint online. There 3 types of SharePoint apps (this MSDN article describes it better) to be developed, this categorization is done using the hosting model of the application.

In your office 365 setup go to SharePoint and create a SiteCollection with the Developer Site template. Make sure to that the template is Developer Site otherwise there’s a high chance that you’ll get an error while debugging the apps which says  “Error occurred in deployment step ‘Install app for SharePoint’: Sideloading of apps is not enabled on this site”

image

Now you’re done, you can develop the apps 🙂

Advertisement

Accessing Contacts Information in Windows 8.1

Windows 8.1 SDK has lots of updates and changes compared to Windows 8 SDK. As an epitome of all these changes most of the Windows 8 SDK methods and classes have been deprecated and not advised to be used in the new development.

This post shows how to access the Contacts information in Windows 8.1 and 8. The new SDK is easy to use for sure and more sleek.

 Accessing Contacts Information using Windows 8 SDK

   1: private async void GetContactsDataUsingWindowd8SDK()

   2: {

   3:     var contactPicker = new Windows.ApplicationModel.Contacts.ContactPicker();

   4:     contactPicker.CommitButtonText = "Select a contact";

   5:  

   6:     ContactInformation contact = await contactPicker.PickSingleContactAsync();

   7:  

   8:     // For multiple contacts Selection

   9:     //IReadOnlyList<ContactInformation> contacts = await contactPicker.PickMultipleContactsAsync();

  10:  

  11:     var viewmodel = new ContactViewModel();

  12:  

  13:     if (contact != null)

  14:     {

  15:         string name = contact.Name;

  16:  

  17:         if (contact.Emails.Count > 0)

  18:         {

  19:             StringBuilder sb = new StringBuilder();

  20:             foreach (IContactField field in contact.Emails)

  21:             {

  22:                 sb.AppendFormat("{0} ({1}) \n", field.Value, field.Category);

  23:             }

  24:             string email = sb.ToString();

  25:         }

  26:  

  27:         // Display the contact’s thumbnail

  28:         Windows.Storage.Streams.IRandomAccessStreamWithContentType stream = await contact.GetThumbnailAsync();

  29:  

  30:         if (stream != null && stream.Size > 0)

  31:         {

  32:             BitmapImage image = new BitmapImage();

  33:             image.SetSource(stream);

  34:         }

  35:     } 


Same to be done in Windows 8.1 SDK

   1: private async void GetContactInfoUsingWindows81SDK()

   2: {

   3:     var contactPicker = new Windows.ApplicationModel.Contacts.ContactPicker();

   4:     contactPicker.CommitButtonText = "Select Contacts";

   5:  

   6:     // select specific properties only

   7:     contactPicker.SelectionMode = Windows.ApplicationModel.Contacts.ContactSelectionMode.Fields;

   8:  

   9:     //contactPicker.DesiredFieldsWithContactFieldType.Add();

  10:  

  11:     var contactCollection = await contactPicker.PickContactsAsync();

  12:     //contactCollection.Add(new Windows.ApplicationModel.Contacts.Contact());

  13:  

  14:     List<ContactViewModel> contactViewModels = new List<ContactViewModel>();

  15:  

  16:     if (contactCollection != null)

  17:     {

  18:         foreach (var contact in contactCollection)

  19:         {

  20:             var viewmodel = new ContactViewModel();

  21:  

  22:             viewmodel.Id = contact.Id;

  23:             viewmodel.FullName = contact.FirstName + " " + contact.LastName;

  24:  

  25:             if (contact.Emails.Any())

  26:             {

  27:                 foreach (var email in contact.Emails)

  28:                 {

  29:                     if (email.Kind == Windows.ApplicationModel.Contacts.ContactEmailKind.Personal)

  30:                     {

  31:                         viewmodel.PersonalEmail = email.Address;

  32:                     }

  33:                 }

  34:             }

  35:  

  36:             var thumbnail = await contact.Thumbnail.OpenReadAsync();

  37:  

  38:             if (thumbnail != null && thumbnail.Size > 0)

  39:             {

  40:                 viewmodel.ContactThumbnail.SetSource(thumbnail);

  41:             }

  42:  

  43:  

  44:         }

  45:     }

  46: }


Code for the View Model class used in 8.1

   1: public class ContactViewModel

   2: {

   3:     public string Id { get; set; }

   4:  

   5:     public string FullName { get; set; }

   6:  

   7:     public string PersonalEmail { get; set; }

   8:  

   9:     public BitmapImage ContactThumbnail { get; set; }

  10: }

You can notice that 8.1 version the methods have changes and enums have been introduced to make the development more concise.

WinRT or WinMD Components

The WinRT platform provides developers with a new way to build reusable software components. WinRT types packaged in a WinRT component, also called a WinMD component (WinRT components == WinMD components). In traditional .NET application development, you could create a dynamic-link library (DLL) as a managed class library and use it in one or more applications.

This option is still available in Visual Studio. However, you can change the output type of a library project from class library to WinRT component, and the output of such a project is a WinMD (Windows Meta Data) file.


Benefits of creating a WinMD / WinRT component.

Contrasting to the DLL files WinRT / WinMD components can be accessed by unmanaged languages like C++ and Javascript. This allows us to create a WinRT / WinMD component in a managed language (C# or Visual Basic) and use it across different Windows Store Apps (WSA) projects implemented in unmanaged languages.

But this flexibility comes with some restrictions.

  • All public classes in WinRT / WinMD component should be marked sealed.
  • public fields aren’t allowed.
  • public data members must be declared as properties
  • Data types should be WinRT / WinMD compatible
  • Creating a WinRT / WinMD component in C++ has some additional property attribute settings (activatable class and ect…)


Creating a WinRT / WinMD component in C#

This is a very simple example and straight forward create Windows Store Apps (WSA) class library. Mark the class public and sealed. Create a method to return a string value.

image

Go to Project Properties and change the output type from Class Library to Windows Runtime Component. 

image

Component Code image


Do the build.

Accessing the C# WinRT in Javascript

Create a WSA project in Javascript. Add the WinRT project reference to the Javascript project.

Create a Javascript method to call the WinRT method. VS intellisense would guide you.

Javascript Code.

image

Here you can notice that the GetDate() C# method is formatted to getDate() with Javascript naming convention.

HTML Code

image

Run the code. 🙂

Things to consider

When you create a WinRT / WinMD component it is specifically designed for the Windows Runtime. Windows Runtime supports different language executions. In the above Javascript project we have a WinRT component developed in C# executed in the Javascript app. This is very useful when you want to extend your existing LOBs. You can use your existing managed code with little modifications, this cuts down development cost.

And also some complex data processing codes are hard to be written in pure Javascript. You can implement those in C++ and use the component in your front facing Javascript WSA.

Office 365 – SharePoint app development using Napa

This post contains few important screenshots of Office 365 SharePoint app development using Napa.

Napa is a free Office 365 app which brings a development environment within the browser, though this not enough for most of the advanced developments this is quite handy it has debug mode, intellisense and other cool features. And also you can download your project to your machine along with all the deployment settings and edit in your Visual Studio as well. Napa is a good place for a beginner to start and to do quick tweaks in the code.

Once you activate your Office 365 account you can start jump into development (your Office 365 subscription should be Microsoft Office 365 Enterprise Developer).

Since all the developers do not have the subscription I captured few screenshots and put it here.

1) First you have to install Napa in your Office 365. It’s free.

2) You select what app you are going to develop.

Selecting the app to develop


3) Napa opens the app template for you in the browser.

2

As you can see in the left hand side we have a toolbox (thin gray layer) with commands for debug, run in local Visual Studio, Publish and more. Next to that another thick light gray bar which serves the purpose of the Solution Explorer of the VS. Here the SP app have a file named App.js. This is the startup file for our SP apps. Then we can have our custom ASPX pages as we want.

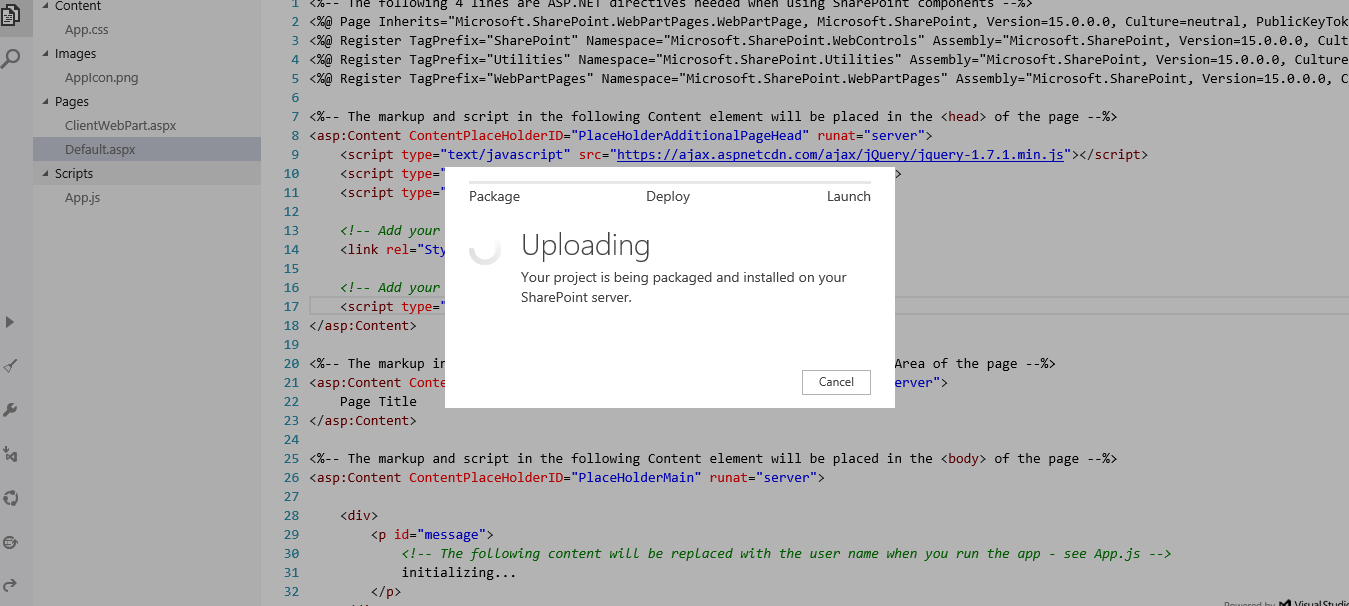
When I click the debug, a pop up comes to show the progress of packaging and deploying for the debug. (as shown in the screen).
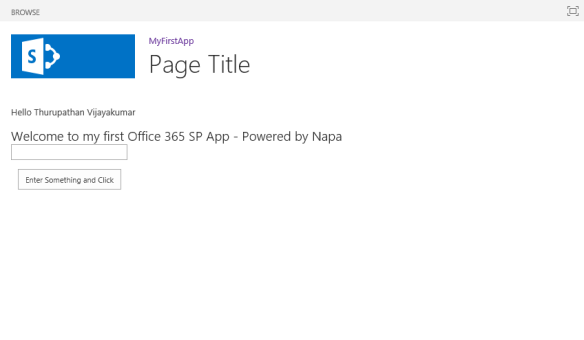
4) First Run

3The template is configured to print the logged in username in the app, this code is set in the App.js. So when I ran the app without making any changes in the code I got the above screen.

5) Editing and Debugging

4I edited the code and put some controls and ran the app. Wow I’m a techie now 😛


6) Connecting to Local Visual Studio to download the project

5

When you try to connect to the local VS the above popup is shown, and you can choose your preferred language and continue. (Wait, if I were to select the language now so far I developed the app. The point is when you create a project in Napa it creates the project for you based on the JavaScript development. – Remember I get the App.js) So when I try to import my project to the local VS and edit it asks what is my preferred language of development.

When you first import a project from Office 365 Napa we need some additional plugins to be installed in our local machine. This is mostly based on what pre installed VS configurations. But need not to worry MS Web Platform installer will take of your download.

Forget the web parts and develop the Apps. 🙂

I think along with Office 365 and SharePoint MS has framed their development sector ‘Office Development’ properly. Earlier though we say Office Development, SharePoint development was going in a different way and Office module development was going in another way. Now things are merged not only in words but also by the scenarios and environments as well.