How to Upgrade SQL Azure Database to V12

Before upgrading we should check the the current SQL Azure version. Connect to your SQL Azure server and execute the following command to get the version and other information.

image

I got the below results

image Note the version shows 11.0.9229.2, considering the major version number  (in this case 11) we know that this SQL Azure Server is V11.

In order to get the full upgrade information see this web site, and the article describes the relation between exact version number and V terminology. (portion of the article below)

A.1 Version clarification

This document concerns the upgrade of Microsoft Azure SQL Database from version V11 to V12. More formally the version numbers are close to the following two values, as reported by the T-SQL statement SELECT @@version; :

  • 11.0.9228.18 (V11)
  • 12.0.2000.8 (or a bit higher, V12)

Upgrading

You can upgrade the SQL Azure server to V12 (meaning the version 12.0.2000.8 or higher) from the new Azure Portal. (http://portal.azure.com)

View this article for the step by step upgrading for the process with screenshots

Connecting to Ubuntu VM on Azure using Remote Desktop Connection

In order to connect to your Ubuntu VM from a Windows first we have to enable the XRDP in the Ubuntu in order enable the Remote Desktop Connection.

So to enable XRDP we should connect to the server, PUTTY is a the commonly used client for SSH. (SSH is enabled by default in the Ubuntu VM on Azure). Download PUTTY from here and follow the steps in this article to connect to the Ubuntu server.

Once connected with username (azureuser) and password execute the following shell command to enable XRDP on the server

sudo apt-get install xrdp

After executing the command go to Microsoft Azure management portal and Add the Remote Desktop Connection endpoint for the server. Once you’ve added this endpoint you can see the connect icon is back to live (earlier it was grayed out) click on the connect icon and download the RDP file for the Remote Desktop Connection.

Now you can connect to your Ubuntu VM from Windows.

Note still your Ubuntu environment has the shell, if you want to enable the interactive desktop execute the following commands in the connection you made.

First I executed this.

sudo apt-get install ubuntu-desktop 

But things there was message saying to run the update, so I executed the update with this command and executed the install command again, everything was fine and smooth.

sudo apt-get update 

Close the connection and connect again, (logoff and reconnect) you will be welcomed with the Ubuntu desktop experience.

image

For this demonstration I used Ubuntu Server 12.04 LTS

Microsoft Azure API Management Policies

This is the second post of the Microsoft Azure API Management tutorial. See the first post – Introduction to Microsoft Azure API Management. This post describes about the advance

Policies define the rules for the incoming and outgoing API requests. See this link for the full API Management Policy Reference. Different policies are applied at different levels of the API Management. In order to define a policy go to Policies tab, select a Product or a API or an Operation based on what the policy could be applied, then drag and drop the policy template and fill the parameters. (I think Microsoft Azure will come with a good UI for doing this in the near future).

For example I’ve explained how to create a policy to limit the number of calls to the API. I have the same API I explained in the previous post – Introduction to Microsoft Azure API Management. Go to Policies tab select the Product and in the right hand side you will the list of policies. Since you we haven’t configured any policies yet the work area will ask you to create a policy for the API. Click ‘Add Policy File’. Then click on the <inbound> section of the XML. The position of the cursor is important based on which policy you want to add; in this sample we’re adding a call limiting policy then its obvious we should add in in the inbound section of the XML if you keep the cursor in other areas and try to add the call limiting policy the interface will react numb. Unfortunately if won’t tell you what’s wrong but simply you cannot add the policies. API Management Policy Reference will guide you get the knowledge about the usage of the policies.

Call Rate Limiting Policy

Capture

Once the policy is added you can see the policy template and it’s a matter of filling the blanks. Notice that this policy is applied in the Product level in the configuration, but it provides the granularity to control the calls to Operations level in the XML. I have added few inputs and the final policy looks like the following.

defined policy

The XML template is self descriptive. Here I have mentioned that only 10 calls could be made in 60 seconds from one subscriber (from one subscription key). And in that 10 calls Nebula Customers API  would handle 6 and again even those 6 calls are equally divided to 2 Operations. After editing the template we save the configuration. Then let’s check that in the Developer Portal.

too many requests

See the response when I try to make the 4th call to the operation it says me to wait for some time. I personally prefer this error message because it’s very helpful and developers can easily hook up any automatic retry call with an accurate timer event rather than randomly polling the service.

Content Serialization

Now let’s check another policy; notice that the API Management outputs the content in JSON as it is the default content format of our backend service. Suppose if I need the format in the XML  I can use the ‘Convert JSON to XML’ policy. Make additional note here that this policy could be applied at API or Operations scopes. So we should select the API and create a new policy configuration.

image 

Since I have applied this policy at the API level all the Operations in the API will return XML. Let’s check that by invoking the same Operation we invoked in the previous scenario and we get the response in XML as expected.

image

There are plenty of Policies available as templates including CORS access, IP restriction and others. Try different policies to get know them better in the implementation. I think soon Microsoft Azure team will come up with a new user interface for the Policy management.

Introduction to Microsoft Azure API Management – Step by Step tutorial

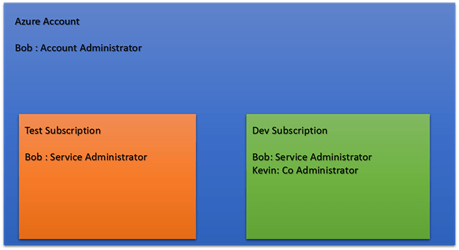
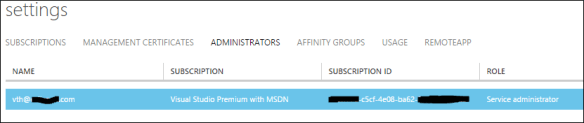
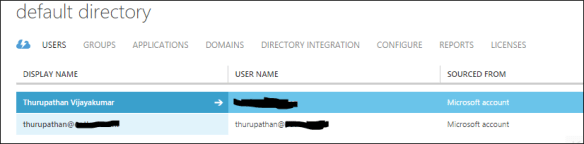
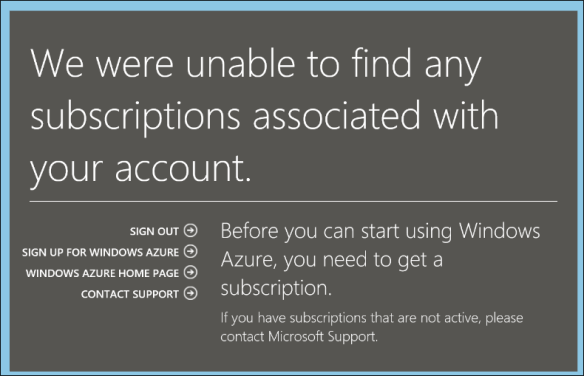
Introduction to API Management

Microsoft acquired a company named Apiphany last year (read about the acquisition) and jumped to the API Management market. So what is API Management ? Given below is the definition what Google gives for the question; indeed it’s a fairly well descriptive definition.

imageMicrosoft Azure API Management is backed by the compute and the storage of Microsoft Azure. Rest of the post explains how to get started with the API Management.


Getting Started with Microsoft Azure API Management

Login to the Microsoft Azure portal, go to API Management and create a API Management service. In the first screen of the wizard you have to specify the URL, select the subscription (if you have more than one) and the region.

image

In the next screen you enter your organization name and the administration email. (you can simply enter your personal email here it doesn’t need to be the one with your organization domain specific one. I used my hotmail id).

image

In this screen you can select for the advance settings, which opens the third wizard panel. There you can select the tier. There are two tiers available; Developer and Standard. Default selection is Developer tier.

See the difference between the tiers : http://azure.microsoft.com/en-us/pricing/details/api-management/

Now the API Management service has been provisioned.

image 

Creating APIs

Click on the arrow icon and get inside the service, then click on the Management Console. By default when you create a Azure API Management service it creates a sample API known as Echo API and sample Product. I deleted all the auto generated default APIs and Products and this article walk you through from the scratch.

API Management requires a back end service, which is our real web service we want to expose via API Management to developers. I created a simple REST service using Web API and hosted it in the Azure Websites. The URL http: //nebulacustomers.azurewebsites.net/ 

With those information we can now start using Azure API Management. First we have to create a API. In the management console click on APIs and create one.

image

Enter the name of the API and the web service URL. Web API URL suffix is a URL suffix which is to group and categorize the service endpoint as you create many APIs. It is optional but good to have because that will make your life easier as your number of APIs grows. By default HTTPS is selected.


Adding Operations

Technically speaking operations are trigger points of the web service in the API Management. Click on the API we created (Nebula Customers) and select the Operations tab and click on ADD Operation.

image

Here we can create operations and point them to our backend web service. Many operations can point to a single endpoint in our backend service. In my backend service I have only two endpoints.

http: //nebulacustomers.azurewebsites.net/api/customers – List of customers

http: //nebulacustomers.azurewebsites.net/api/customers?name=<name> – Gets the specified customer object.

We create 3 operations, two of them will point to the first endpoint and the last one will point to the endpoint with the name parameter.

Create three operations as follows.

Operation to list the customers

  • HTTP Verb – GET
  • URL Template – /customers
  • Rewrite URL Template – /api/customers
  • Display Name – List of customers

Operation for the cached customers

  • HTTP Verb – GET
  • URL Template – /cachedcustomers
  • Rewrite URL Template – /api/customers
  • Display Name – List of customers
  • And go to Cache tab and check the Enable.

Note that above 2 operations are pointing to the same endpoint in our backend service as the rewrite the URL templates are same. Here caching is done by the API Management and our backend service isn’t aware of it.

Third operation to get the customer with the specified name.

  • HTTP Verb – GET
  • URL Template – /customers/{name}
  • Rewrite URL Template – /api/customers?name={name}
  • Display Name – Get the customer by name

After adding all three operations you will have a similar screen like this.image

Creating Products

Now we have our API and operations, in order to expose the API to developers as packed module we should create a Product and associate the API to it. One Product can have many APIs. Developers who subscribe to a Product get access to the APIs associated with the Product.

Go to Product tab and create new Product.

image In this screen check the “Require subscription approval” if you need to get email requests for approving the subscription requests. You have to configure this email address in the notification section. Second checkbox “Allow multiple simultaneous subscriptions” allows the developers to create more than one subscription for the product. Each subscription is identified by a unique key and in this option you also can specify the maximum number of simultaneous subscriptions.

After creating the Product click to open that and associate the APIs to the Product. Click in ADD API to Product.

image

Go to Visibility tab in the product section and check Developers. Developers need to authenticated themselves in the Developer Portal, subscribe to Products and obtain subscription keys in order to use the API. Guests are unauthenticated users who allowed to view the APIs and operations but not to call them. Administrators are the people who create and manage APIs, Operations and Products.

After enabling the visibility to developers Publish the product in order to make it available in the Developer Portal.


Developer Portal

Now the API is built and published, now it’s the developers work to deal with the Developer Portal and subscribe to the product. Click on the Developer Portal link in on the right hand top corner. When you’re working as the administrator and click on the Developer portal you are logged into the Developer portal as administrator.

image

The above is the default view of the Developer Portal. You can do branding on the portal if required.

Go to Products and you can see the Product we created and as an administrator you’re already subscribed to this Product. So click on the APIS tab click on the specific API.

image

Click in the List of Customers operation and click on the Open Console in order to check test the service.

image 

Click on th HTTP GET and invoke the service. The above URL is the full URL with the subscription key. Response comes in JSON (as this is the default of my backend service).

image 

Now invoke the List of cached customers and check the response time.

First call it took 402ms.

image

Second call took only 15ms.

image


Similarly invoke the Get customer by name specifying a parameter. The coolest part of the Developer Portal is that it’s really helpful for the developers to test the endpoints and also it generates the code in may languages on how to consume those endpoints. Below is the code generated in Objective C for consuming the customer name endpoint.

image


Conclusion for the Introduction

Now our API Management service is working perfectly. We can control the input and output of the service in more granular ways using policies. We can configure notifications, customize email templates, security, assigning different identity management of developers and much more. These things I will cover in the API Management Advanced tutorial on another blog post.

If you want to try the exact demo I’ve explained here you need the exact backend service. You can download it here. (requires Visual Studio 2013)

How to programmatically create Azure Storage account – .NET SDK

Azure provides Management APIs to manage Azure subscriptions programmatically. Management APIs are available in many languages including PowerShell cmdlets and Java SDK.

In order to create a acting agent to manage the Azure (our application code is an agent) we do have to authenticate to Azure using a certificate or Azure Active Directory. Refer to this article on how to create a certificate authentication with Azure. This article describes how to create a certificate, associate it with the Azure subscription and how to programmatically retrieve the X.509 certificate from the local machine.

The below code shows the continuation on how to create Azure Storage programmatically. In order to do this add the references of Azure Management Libraries to your project.

image

Now we have the right references in place, now we have to create the certificate cloud credentials in order to invoke the Azure Management Client classes. We need two parameters to create the certificate cloud credentials.

  1. Azure Subscription ID
  2. Azure Authentication certificate (steps to obtain this are described in this link)

So based on the above article we have established the trust between Azure and our agent. And we have the certificate in .NET. Let’s assume our certificate variable is “certificate”.

Now create the CertificateCloudCredentials object using the subscription ID and X.509 certificate.

   1: string subscriptionId = "your id";

   2: CertificateCloudCredentials credentials = new CertificateCloudCredentials(subscriptionId,certificate);

Now we can create the storage account using the blow code.

   1: private static void CreateStorageAccount()

   2: {

   3:     var storageClient = CloudContext.Clients.CreateStorageManagementClient(credentials);

   4:     

   5:     var response = storageClient.StorageAccounts.Create(new StorageAccountCreateParameters()

   6:     {

   7:         Location = LocationNames.EastAsia,

   8:         Name = "storage name",

   9:         Description = "storage from code"

  10:     });

  11:  

  12:     Console.WriteLine(response.StatusCode);

  13: }


Here the Create method is a blocking method, but Azure Management Libraries offer async methods as well as CreateAsync. So we can use them with Task<await>. Learn more about asynchronous programming here.

Configuring Azure CDN (Content Delivery Network)

Azure provides CDN. You can link websites, cloud services, mobile services, media services and storage accounts. Most of the cases we link the storage accounts to CDN. Because CDN is a very good choice for static content and in Azure mostly we keep the static content in the storage accounts (blobs).

CDN provides a greater network among different geographical network and place the content in the “Edge Servers” as they’re physically close to the users’ location. Azure Cache is a different service it offers in memory cache for high speed availability, it is relatively expensive compared to CDN. See this article on how to create Azure Cache.

Creating a CDN in Azure is fairly straight forward. Login to the Management Portal and Select the CDN and create new endpoint. You have the Quick Create option. You get the below screen. In the origin domain you can see your available services that could be linked as CDN endpoints under each category. Here I select my storage account as origin domain. You can notice that automatically the storage account’s blob storage service is linked with the CDN as it holds the static content. Neither the Table storage nor the Queue storage is linked as CDN.

image


I created a public container in the above blob storage and uploaded  a simple text file. The public URI for the resource goes as http://qbemediasvc.blob.core.windows.net/publiccontainer/dfdf.txt

Out CDN endpoint URL goes as http://az673726.vo.msecnd.net/

In order to check the content is in CDN we can simply append the last part of the blob URI to the CDN endpoint URL and we get the CDN URL as this. http://az673726.vo.msecnd.net/publiccontainer/dfdf.txt

When you put a content in the storage it will take up to 60 minutes for that content to propagate to CDN and once the propagation is done you can access the CDN rather than the direct URL of the content.

How to create a certificate authentication with Azure Management Service

In order to carry out any management tasks in Azure using an agent (Visual Studio or any custom code), it should authenticate itself with Azure. Requests to the Azure Management API should be authenticated using on of the following methods.

  • Active Directory
  • Certificate Authentication

This article covers the certificate authentication. Azure Management Service (AMS) APIs require a X.509 certificate for the authentication. For the development purpose we can create a sample certificate in our machine using the following command line. Make sure you open the Visual Studio command line in administrator mode to execute this.

makecert -sky exchange -r -n "CN=<CertificateName>" -pe -a sha1 -len 2048 -ss My "<CertificateName>.cer"

image

This creates the certificate in the local machine under the Personal Certificates since I have specified “My”as location.

Open the Certificate Manager in your local machine (enter certmgr.msc in the Run). You can check for your new certificate.

image


We should upload this certificate to Azure to establish the trust and each and every API request should contain the certificate. Certificates are saved in Azure under subscriptions thus they are used to manage the subscription owner actions. Each subscription can contain up to 100 certificates as of this writing.

Export the certificate from certificate store, as a .cer file. Follow the screen shots below.

image image image image image

Once you have exported the certificate, next step is to upload it to the Azure subscription. Login to the Azure select the correct directory if you more than one under your login and select the correct subscription to which you need to upload the certificate. Then go Settings and go to Management Certificates tab, there you can upload your certificate.

After uploading the certificate you can view it in grid like this.

image


To summarize what we’ve done up to now,

  • We need establish a trust between Azure and the subscription agent via certificate authentication.
  • Subscription agent is the party / tool which programmatically carries our the tasks of a subscription owner.
  • First we generated a local certificate using certmgr.msc
  • We exported the certificate and put it in the Azure management certification store.
  • So now any subscription agent with the certificate can perform the subscription ownership tasks (using Azure Management API) thus authenticating using the certificate.

The below C# code shows how to retrieve the certificate from your local store by providing the thumbprint.

   1: public X509Certificate2 GetStoreCertificate(string thumbprint)

   2: {

   3:     List<StoreLocation> locations = new List<StoreLocation>

   4:     {

   5:         StoreLocation.CurrentUser,

   6:         StoreLocation.LocalMachine

   7:     };

   8:

   9:     foreach (var location in locations)

  10:     {

  11:         X509Store store = new X509Store("My", location);

  12:         try

  13:         {

  14:             store.Open(OpenFlags.ReadOnly | OpenFlags.OpenExistingOnly);

  15:             X509Certificate2Collection certificates = store.Certificates.Find(X509FindType.FindByThumbprint, thumbprint,false);

  16:

  17:             if (certificates.Count == 1)

  18:             {

  19:                 return certificates[0];

  20:             }

  21:         }

  22:         finally

  23:         {

  24:             store.Close();

  25:         }

  26:     }

  27:

  28:     throw new ApplicationException("No Certificate found");

  29: }

The above code tries to get the certificate from the Personal certification location, as the parameter “My” has been passed to the X509Store constructor.

After obtaining the certificate, you should pass it through each and every Azure Management API request whether you use the REST API or any language SDK.