SQL Server 2016 Always Encrypted

Introduction

SQL Server 2016 is yet to be released, but you can download the CTP versions. The mostly anticipated and marveled feature is Always Encrypted. Let me discuss few bits of this feature before getting into the technical side of it.
I got to know this right after reading an article about Microsoft had applied some court case to safeguard the information of one of its users, from the US laws. This is highly appreciated and I personally feel that Microsoft is at the forefront of protecting customer data. And I made a tweet.

If customer can secure their data without any control of public cloud vendors, even in the situations like powerful unauthorized people gaining access to your data results in reduced data theft. And it solves a headache for the public cloud vendors as well.

How it works

SQL Server 2016 Always Encrypted is a feature which allows the encryption and the decryption of the data in the client side, rather than in the database server itself. Since the encryption happens in the client side using a client driver data is secured not only at rest but also at transit, this makes the feature takes its pride name Always Encrypted.

Always Encrypted works as follows.

  • First we have to create Column Encryption Keys (CEK) and Column Master Keys (CMK) in the Always Encrypted section of the database

  • CEKs are symmetric keys and CMKs are asymmetric keys.
  • CEKs are stored in SQL Server where CMKs are stored outside the SQL Server. Read this MSDN article to get information about how to create these keys.
  • Create database with the table and specify the columns to be encrypted. Note that the encryption type (deterministic or randomized), encryption algorithm and the CEK to be used are specified.

  • In the demo I’ve created the CMK in the local certificate store of the machine, but you can keep the CMK wherever possible. Because SQL Server stores only the meta data of the CMK.
  • Now the database is ready. We need .NET 4.6 client application to access the data in the Always Encrypted enabled database. I summarized everything in this image.

  1. Application sends an INSERT statement, driver intercepts the statement and identifies the database it talks is an Always Encrypted feature enabled database. This identification happens because of the connection string property Column Encryption Setting=Enabled. So the driver asks the database to send the details of the encryption for the specific table.
  2. SQL Server returns column details, encrypted values of the CEK, CMK name and the path.
  3. Client driver retrieves the CMK using the meta received from the SQL Server. In this step driver gets the private key of the CMK, which is used to decrypt the encrypted CEK. (CEK is encrypted using CMK’s public key during the creation of CEK in the SQL Server, also the CEK is signed by the private key of the CMK) SQL Server does not store the CMK’s private key.
  4. Client driver encrypts the data using the decrypted CEK and send it to the SQL Server.
  • Read operations also work similar as SQL Server send the encrypted data along with the encryption details and CMK meta data information. Client driver then retrieves the CMK decrypts the CEK and the decrypts the data.
  • Client driver implements possible caching of the keys for performance.

Sample .NET application code for the above table

Management Features

You can see the definitions of the CMKs using this command. SQL Server stores the meta data of the CMKs

You can see the definitions of the CEKs using this command

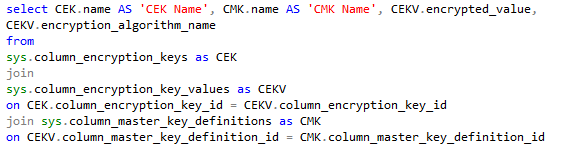
Joining the above two along with the sys.column_encryption_key_values we can get the association relationship.

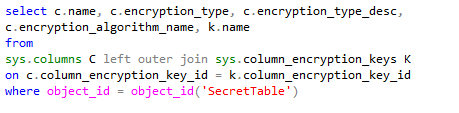
You can execute the following command to get the Always Encrypted meta data for the table.

Other useful reads

http://www.infoq.com/news/2015/06/SQL-Server-Always-Encrypted (read the comments for known FAQs)

http://blogs.msdn.com/b/sqlsecurity/archive/2015/06/04/getting-started-with-always-encrypted.aspx (Getting started with Always Encrypted)

http://sqlperformance.com/2015/08/sql-server-2016/perf-impact-always-encrypted (Performance of Always Encrypted)

You can use Azure Key Vault as the CMK store

https://thuru.net/2015/05/30/azure-key-vault-setup-and-usage-scenarios/ (Introduction to Azure Key Vault)

http://blogs.msdn.com/b/sqlsecurity/archive/2015/09/25/creating-an-ad-hoc-always-encrypted-provider-using-azure-key-vault.aspx?wt.mc_id=WW_CE_DM_OO_SCL_TW (Creating custom CMK provider, using Azure Key Vault)

Advertisement

How to Upgrade SQL Azure Database to V12

Before upgrading we should check the the current SQL Azure version. Connect to your SQL Azure server and execute the following command to get the version and other information.

image

I got the below results

image Note the version shows 11.0.9229.2, considering the major version number  (in this case 11) we know that this SQL Azure Server is V11.

In order to get the full upgrade information see this web site, and the article describes the relation between exact version number and V terminology. (portion of the article below)

A.1 Version clarification

This document concerns the upgrade of Microsoft Azure SQL Database from version V11 to V12. More formally the version numbers are close to the following two values, as reported by the T-SQL statement SELECT @@version; :

  • 11.0.9228.18 (V11)
  • 12.0.2000.8 (or a bit higher, V12)

Upgrading

You can upgrade the SQL Azure server to V12 (meaning the version 12.0.2000.8 or higher) from the new Azure Portal. (http://portal.azure.com)

View this article for the step by step upgrading for the process with screenshots

How to create code snippets in SQL Server Management Studio (SSMS)

Recently I’ve been working on a project which requires plenty of stored procedures and custom logging. For error handling I don’t want to repeat my logging TSQL statements for each and every SP I write. I created a code snippet and let the IDE code for me. Follow these simple steps to create code snippets in SSMS. The following example inserts pure TSQL code without any parameters and at the end of this blog post I’ve mentioned how to create code snippets which include parameters using one of the built in code snippets of SSMS.

Code snippets are stored as XML files in particular format and imported in to the SSMS. These XML files have the extension of .snippet and you can find the built in code snippets in this location

C:\Program Files (x86)\Microsoft SQL Server\110\Tools\Binn\ManagementStudio\SQL\Snippets\1033

Let’s call this path as 1033 Snippet Root

In order to get the .snippet file template open one of the simplest built in code snippets from the 1033 Snippet Root. You can find this from the View folder. Under the View folder there’s a code snippet name Create View.snippet

Open it in a text editor, (Notepad++ would be a good choice). This is the structure of a basic TSQL code snippet XML file.

View Snippet

The snippet I created is far more simpler than the above as it does not require any parameters, so I do not need the <Declarations></Declarations> section. Under the <Snippet></Snippet> I have only the <Code></Code> block.

image


The above code snippet will get the error details of the current execution context and THROW it.

After creating the XML file save it with a .snippet extension. I saved the above as Default Throw.snippet Now we have to import the snippet into the SSMS.

Importing a code snippet into SSMS

Open SSM, go to Tools and then click Code Snippets Manager

image

Select a folder where you want to put your snippet (This folder structure is simply a categorization of the snippets). If you want you can add a new folder as well. In my case I wanted to put the snippet under My Code Snippets folder. Then click Import. Browse for the snippet file and import it.

image

That’s all, now we can use the our snippets in the TSQL editor of SSMS. In order to bring the snippet intellisense press Ctrl +K, Ctrl + X and choose the folder then your snippet and press TAB to insert it.

image

Recovering a SQL Server database from Suspect Mode

Yesterday my SharePoint environment didn’t respond I checked the DB server and got to know few SharePoint databases were in suspect mode. Now I want to make the databases up and running as usual in order to get my work done. This is a SQL Server thing. There could be several reasons for a database to go to the Suspect Mode. In my case my .ldf file was corrupted.

This forum thread explains more reasons why a database goes to Suspect Mode.

image

In order to get the database follow these steps. Login to the server using an account with sysadmin privileges. And set the target to database to EMERGENCY mode.

   1: ALTER DATABASE [db name] SET EMERGENCY


image

Then set the database to SINGLE USER mode in order to run the recovery.

   1: ALTER DATABASE [db name] SET SINGLE_USER

Now you can run the following command to rebuild the transactional log file. Here data loss is allowed.

   1: DBCC CheckDB ([db name], REPAIR_ALLOW_DATA_LOSS)

Then set back the database to MULTI USER mode.

   1: ALTER DATABASE [db name] SET MULTI_USER


Sometimes you might run into problems where you cannot set the database to MULTI USER mode; SQL Server complains with this error “The database is in single-user mode, and a user is currently connected to it.”

The database is in single-user mode, and a user is currently connected to it.

Sometimes you might get the above error message from SQL Server when you try to change the user mode from MULTI to SINGLE.

You have to explicitly kill the connection in order to solve the problem. First you need the dbid of your database. Run the following command.

   1: SELECT name, database_id

   2: FROM sys.databases 

   3: WHERE name = 'db name'

Once you get the dbid you can check the connections to the database. Run the following command.

   1: SELECT spid FROM sysprocesses WHERE dbid = @dbid

spid is the connection process id. We have to kill all the spids  in order to run our command which sets the MULTI USER mode. For example think you get the spid as 10. Run the following command to kill the connection and set the database user mode.

   1: USE MASTER

   2: KILL 10

   3:  

   4: ALTER DATABASE [db name] SET MULTI_USER

   5: GO

Hierarchy in TSQL – step by step guide

Hierarchy data type is introduced in SQL Server 2008. It is a CLR data type. This post gives a simple step by step guide to implement HierarchyID data type

Hierarchical navigation or simply the navigation between nodes could happen in 2 ways.

  1. Depth First
  2. Breadth First

Having said that, we’ll start the tutorial. Create a table as follows. Node is the HierarchyID type, NodeLevel column is a calculated column which contains the level of the Node in the hierarchical tree. ID and Name are custom data type for the information we have. Let’s try to model a organizational reporting hierarchy in using the table h.

   1: create table h (

   2: Node HierarchyID primary key clustered,

   3: NodeLevel AS Node.GetLevel(),

   4: ID INT UNIQUE NOT NULL,

   5: Name VARCHAR(50) NOT NULL

   6: )

Since we’ve defined the Primary Key in the Node column, we get the Depth First index by default. To create a Breadth First index you can run the following query. In real scenarios you do not need to create both indexes, it depends on your requirement to decide which index to be created. Sometime you may need both as well.

   1: -- this creates the bfs index to the table.

   2: create unique index bfs_index

   3:  on h (NodeLevel,Node)

Now we’ll insert data.

   1: insert into h (Node, ID, Name)

   2:    values (HierarchyId::GetRoot(), 1, 'Thuru')

Here I’ve passed the HierarchyId::GetRoot() as the value for the Node. Few things to note here, we ask the SQL Server to give us the HierarchyID of the root node. We use the SQL CLR function GetRoot for this. The :: is marked because GetRoot is a static method inside the HierarchyID SQL CLR data type.

Mark this statement as our common SELECT statement. NodeText is the string representation of Node.

   1: select Node.ToString() AS NodeText, * FROM h

image

Now I insert a person in the next level.

   1: declare @parent hierarchyid = hierarchyid::GetRoot()

   2: insert into h (Node,id,Name) values

   3:     (@parent.GetDescendant(null,null),2,'Johnny')

   4: go

Here I get the parent Node value using the static function GetRoot(). GetDescendant() method returns the descendant Node value between the right and left sibling. In this case our top level node doesn’t have any children, apparently no siblings so we do pass null. After executing the above query now we have this structure.

image

Let’s add another person below ‘Thuru’. Note this time I get the parent node using the SELECT statement which asks for the Node of ‘Thuru’. And now I want to insert the new Node in the level of Johnny and after him. So for the new node the right sibling is Johnny and the left sibling is null. The query goes like this.

   1: declare @parent hierarchyid = (select Node from h where name = 'Thuru')

   2: declare @jhony hierarchyid = (select Node from h where name = 'Johnny')

   3: insert into h (Node, ID, Name) values (@parent.GetDescendant(@jhony,null), 3, 'Robert')

image


image

Now it’s a simple guess for you what should be done to insert a new node between Johnny and Robert.

   1: declare @parent hierarchyid = (select Node from h where name = 'Thuru')

   2: declare @jhony hierarchyid = (select Node from h where name = 'Johnny')

   3: declare @robert hierarchyid = (select Node from h where name = 'Robert')

   4: insert into h (Node, ID, Name) values (@parent.GetDescendant(@jhony,@robert), 4, 'Alex')

image image


Executing couple of inserts ….

   1: declare @parent hierarchyid = (select Node from h where name = 'Thuru')

   2: declare @alex hierarchyid = (select Node from h where name = 'Alex')

   3: declare @robert hierarchyid = (select Node from h where name = 'Robert')

   4: insert into h (Node, ID, Name) values (@parent.GetDescendant(@alex,@robert), 5, 'Niki')

   5: go

   6:  

   7: declare @parent hierarchyid = (select Node from h where name = 'Thuru')

   8: declare @alex hierarchyid = (select Node from h where name = 'Alex')

   9: declare @niki hierarchyid = (select Node from h where name = 'Niki')

  10: insert into h (Node, ID, Name) values (@parent.GetDescendant(@alex,@niki), 6, 'Steve')

  11: go

  12:  

  13: select Node.ToString() AS NodeText, * FROM h

  14: go


image image


Now let’s add 2 children nodes for Steve. Execute the following query.

   1: declare @steveParent hierarchyid = (select Node from h where name = 'Steve')

   2: insert into h (Node, ID, Name) values (@steveParent.GetDescendant(null,null), 7, 'S1')

   3: go

   4:  

   5: declare @steveParent hierarchyid = (select Node from h where name = 'Steve')

   6: declare @s1 hierarchyid = (select Node from h where name = 'S1')

   7: insert into h (Node, ID, Name) values (@steveParent.GetDescendant(@s1,null), 8, 'S2')

   8: go

image image


IsDescendantOf method and GetAncestor methods are useful in querying the structure.

The following query returns the immediate set of nodes of the specified node.

IsDescendantOf

   1: declare @parent hierarchyid = (select Node from h where name = 'Thuru')

   2: declare @parentNodeLevel int = (select NodeLevel from h where name = 'Thuru')

   3: select Node.ToString() AS NodeText, *  from h where 

   4: Node.IsDescendantOf(@parent) = 'TRUE' and node != @parent and 

   5: NodeLevel = @parentNodeLevel + 1

image

In the above query I restricted the query to return only the immediate children using the NodeLevel column. And also notice I have opted out the parent node because IsDescendantOf method includes the parent node as well in the result.


GetAncestor

Gets the ancestors of the specified node in the passed level, if we pass 0 it returns the siblings.

   1: declare @child hierarchyid = (select node from h where name = 'S1')

   2: select * from h where Node = @child.GetAncestor(2)

2 steps above.

image

Immediate parent

   1: declare @child hierarchyid = (select node from h where name = 'S1')

   2: select * from h where Node = @child.GetAncestor(1)

image

Siblings

   1: declare @child hierarchyid = (select node from h where name = 'S1')

   2: select * from h where Node = @child.GetAncestor(0)

image


Deletion

Deleting a node does not delete its children nodes. This results in orphaned children.

   1: delete from h where Name = 'Steve'

After deleting Steve if we execute our SELECT statement we get the following result

image

Note that S1 and S2 have the NodeText /1.1.1/1 and /1.1.1/2 where there’s no /1.1.1 resulting orphaned S1 and S2


Microsoft recommends to use proper stored procedures to match the business scenario to deal with the HierarchyID thus eliminating unwanted results like orphaned children.

Moving Nodes

The GetReparentedValue method is used to move the nodes to different locations.

   1: declare @newParent hierarchyid = (select Node from h where name = 'Johnny')

   2: update h set Node = Node.GetReparentedValue(Node.GetAncestor(1),@newParent)

   3: where name = 'S1'

Here we want to move the S1 as a child node of Johnny. We get the node value of Johnny and get the ancestors in the level of where Johnny is and update the Node of S1. This moves the S1 under Johnny leaving the hierarchy like this.

image

Installing SQL Server 2012 on Windows 8

Installing SQL Server 2012 on Windows 8 is a pain, because SQL Server 2012 needs .NET 3.5. The problem is activating .NET 3.5 in Windows 8 via Turn On/Off Windows features won’t help because .NET 3.5 is considered as an on demand installation feature. Windows Update also fail to address the need. There are good articles describing the exact problem in detail.

You can install the .NET 3.5 in Windows 8 using your installation media and activating the feature. Simple. Insert your installation media or mount the Windows 8 image in a drive.

Open CMD as administrator

Type the following

DISM /Online /Enable-Feature /FeatureName:NetFx3 /All /LimitAccess /Source:J:\sources\sxs

Here J:\ is the drive of my installation media.

You will see a similar screen like this, wait for the installation completes.

sql 2012 installation failure - solution [installing .net 3.5 from media ]


Done ! Now .NET 3.5 has been installed successfully on your Windows 8 PC.

SQL Configuration Manager WMI Error–Remote Procedure call failed [0x800706be]


I got the above error in the SQL Configuration Manager and googled for a solution. Unfortunately first few links were not satisfying, then I tried with some extra effort and found these details.

My box is running on Win 7 x64 and SQL Server 2008.

It is said that this error can occur in 2008 R2 as well. This is due to some bug or flaw in the installation process. I tried reinstalling the entire SQL Server Engine again I got the same error. Read the following forum discussion for more details.

http://social.msdn.microsoft.com/Forums/en-US/sqltools/thread/569ee2d4-0805-40e2-a4f0-10f7d573fd75/

Then I found another option of restoring the assemblies, using the command line. I tried that as well, but again I failed. Here’s the image of the executed command in CMD. Click the image to enlarge.

image

Now I’m in the process of upgrading my SQL Server 2008 to SP3. I can’t update it to 2008 R2 due to some project constraints.

Still I don’t know what is the exact reason for this issue.