Azure Key Vault Logging

This post goes with the series of my posts under the Azure Key Vault.

I assume that you know about Azure Key Vault and have used it, and continue this article. If you’re new to Azure Key Vault, please review the below links.

You can read more about Azure Key Vault and how to use it from this post.

PowerShell script to provision the Key Vault and the C#.NET sample to use it in the GitHub.

An Open source tool to manage Key Vault: Azure Key Vault Manager

Enabling Logging Diagnostics for Azure Key Vault

Recently Azure Key Vault team has announced the logging feature for the Key Vault (which is one of the highly required features).

Logs are written to a storage account in the Azure. So first create a storage account. Then in the PowerShell execute the following commands. Assuming that you have a vault and storage account.

It is good keep the storage account in the same Resource Group of the Key Vault as management would be easy.


We have the vault and storage details in variables, now time to setup the diagnostics


Viewing Logs

Logs are saved as JSON documents in the blob storage of the provided storage account. Do some activities which perform some operations in the Key Vault and get the JSON.

The below is log snippet for retrieving the vault. Note the operation name as VaultGet also the log provides information like the duration and client IP addresses. In the identity section it also provides the used identity information (the Azure Active Directory Identity name) for the specified operation.

The below is another JSON document snippet for the SecretGet operation. Along with the other information the request Uri property gives the details of which secret and the version information.

Disabling the logging Diagnostics

Execute the following line to disable the logging. (assuming the $vault and $storage variables are set as shown above)


SQL Server 2016 Always Encrypted

Introduction

SQL Server 2016 is yet to be released, but you can download the CTP versions. The mostly anticipated and marveled feature is Always Encrypted. Let me discuss few bits of this feature before getting into the technical side of it.
I got to know this right after reading an article about Microsoft had applied some court case to safeguard the information of one of its users, from the US laws. This is highly appreciated and I personally feel that Microsoft is at the forefront of protecting customer data. And I made a tweet.

If customer can secure their data without any control of public cloud vendors, even in the situations like powerful unauthorized people gaining access to your data results in reduced data theft. And it solves a headache for the public cloud vendors as well.

How it works

SQL Server 2016 Always Encrypted is a feature which allows the encryption and the decryption of the data in the client side, rather than in the database server itself. Since the encryption happens in the client side using a client driver data is secured not only at rest but also at transit, this makes the feature takes its pride name Always Encrypted.

Always Encrypted works as follows.

  • First we have to create Column Encryption Keys (CEK) and Column Master Keys (CMK) in the Always Encrypted section of the database

  • CEKs are symmetric keys and CMKs are asymmetric keys.
  • CEKs are stored in SQL Server where CMKs are stored outside the SQL Server. Read this MSDN article to get information about how to create these keys.
  • Create database with the table and specify the columns to be encrypted. Note that the encryption type (deterministic or randomized), encryption algorithm and the CEK to be used are specified.

  • In the demo I’ve created the CMK in the local certificate store of the machine, but you can keep the CMK wherever possible. Because SQL Server stores only the meta data of the CMK.
  • Now the database is ready. We need .NET 4.6 client application to access the data in the Always Encrypted enabled database. I summarized everything in this image.

  1. Application sends an INSERT statement, driver intercepts the statement and identifies the database it talks is an Always Encrypted feature enabled database. This identification happens because of the connection string property Column Encryption Setting=Enabled. So the driver asks the database to send the details of the encryption for the specific table.
  2. SQL Server returns column details, encrypted values of the CEK, CMK name and the path.
  3. Client driver retrieves the CMK using the meta received from the SQL Server. In this step driver gets the private key of the CMK, which is used to decrypt the encrypted CEK. (CEK is encrypted using CMK’s public key during the creation of CEK in the SQL Server, also the CEK is signed by the private key of the CMK) SQL Server does not store the CMK’s private key.
  4. Client driver encrypts the data using the decrypted CEK and send it to the SQL Server.
  • Read operations also work similar as SQL Server send the encrypted data along with the encryption details and CMK meta data information. Client driver then retrieves the CMK decrypts the CEK and the decrypts the data.
  • Client driver implements possible caching of the keys for performance.

Sample .NET application code for the above table

Management Features

You can see the definitions of the CMKs using this command. SQL Server stores the meta data of the CMKs

You can see the definitions of the CEKs using this command

Joining the above two along with the sys.column_encryption_key_values we can get the association relationship.

You can execute the following command to get the Always Encrypted meta data for the table.

Other useful reads

http://www.infoq.com/news/2015/06/SQL-Server-Always-Encrypted (read the comments for known FAQs)

http://blogs.msdn.com/b/sqlsecurity/archive/2015/06/04/getting-started-with-always-encrypted.aspx (Getting started with Always Encrypted)

http://sqlperformance.com/2015/08/sql-server-2016/perf-impact-always-encrypted (Performance of Always Encrypted)

You can use Azure Key Vault as the CMK store

https://thuru.net/2015/05/30/azure-key-vault-setup-and-usage-scenarios/ (Introduction to Azure Key Vault)

http://blogs.msdn.com/b/sqlsecurity/archive/2015/09/25/creating-an-ad-hoc-always-encrypted-provider-using-azure-key-vault.aspx?wt.mc_id=WW_CE_DM_OO_SCL_TW (Creating custom CMK provider, using Azure Key Vault)

Automatically Configure Azure AD in your Web Applications using VS 2015

Some of you might have noticed that in the project context menu, Visual Studio 2015 gives the option ‘Configure Azure AD Authentication

When you click on this, a wizard will open up and it will do most of the heavy lifting for you in configuring the Azure AD for your application. Though the wizard is very rich, it is somewhat flexible as well. In this post I walk you through the direct way of configuring Azure AD Authentication in your application and explain the code generated by the wizard. Read this article to know more about Azure AD authentication scenarios.

First you need an Azure AD domain in order to register your application. You should have this and the user who is going to perform this action should be in the Global Administrator roles for the Azure AD

Assuming that you have the prerequisites to configure the authentication, click the above option.

Step 0


Step 1

  • Enter your Azure AD domain
  • Choose Create a new Azure AD application using the selected domain.
  • If you already have an application configured in you Azure AD you can enter the client ID and the Redirect URI of the application.


Step 2

  • Tick the Read Directory data option to read the Azure AD
  • You can use the properties you read as claims in your application
  • Click Finish


This is will take few minutes and configure the Azure AD Authentication for your application. Also it adds the [Authorize] attributes to your controllers.

Now if you log into the Azure Portal and in the Applications section of the Azure AD you can notice the new application provisioned.

Note that the wizard provisions the app as a single tenant application for you, if you want later you can change that to a multi-tenant application.

Configuring the single tenant application / multi-tenant application is beyond the scope of this post.

Code

The wizard retrieves the information about the app it created, stores them in the configuration file and write code to access them. Main part is in the App_Start folder of the web project the Startup.Auth.cs

The below image shows the code generated by the wizard on a web project which hasn’t had any authentication configured before.

  • First line creates the data context object of the EF model provisioned. This is not mandatory if you are not accessing any data from the database. You can simply delete this line.
  • Second line sets the DefaultSignInAsAuthenticationType property – this will be passed to Azure AD during authentication
  • Third line sets the cookie authentication for the web application.
  • Fourth line of code which looks big and confusing but actually not. It is a common method of OWIN, commonly used in Open Id authentications.
  • Here we specify the options for the Azure AD Open Id authentication and the call backs.
  • Since the above code is bit unclear I have broken the code in a simpler way.

I have simplified the code to the level of retrieving the authentication code. The wizard generated code goes to next level and retrieves the authentication token as well. I haven’t included this in the code because I wanted to simplify the logic as much as possible. After retrieving the authentication code you can request an authentication token and perform actions. This is a separate topic and includes the authentication workflow of Azure AD.

I will discuss Azure AD authentication workflow and how to customize applications in a separate post.

Azure Active Directory (AAD): Common Application Development Scenarios

Azure Active Directory is a cloud identity management solution, but not limited to cloud identity alone. In this post let’s discuss about how AAD can be used in designing multi-tenant applications in cloud. As usual consider that MassRover is an ISV.

MassRover got this great idea of developing a document management application named ‘Minion Docs‘ for enterprises, they simply developed the application for Intranet using Windows Authentication. VTech was the first customer of Minion Docs. MassRover installed the application on premise (in the VTech data centers).

After a while VTech started complaining that the users want to access it outside the organization in a more secure way using different devices, and VTech also proposed that they are planning to move to Azure.

MassRover decided to move the application to the cloud in order to sustain the customers, also they realized that moving to the cloud would open the opportunity to cater multiple clients and they can introduce new business models.

Creating Multi-Tenant Applications

The Intranet story I explained is very common in the enterprises.

All the organizations have the burning requirements of handling the modern application demands like mobility, Single Sign On and BYOD without compromising existing infrastructure and the investments.

MassRover team decided to move the application to the Azure in order to provide solutions for those problems and leverage the benefits of the cloud.

First Mass Rover got an Azure subscription and integrated Minion Docs as a multi-tenant application in their AAD. As an existing Intranet application this requires minimum rewrite with more configuration.

The below setup window is the out of the box ASP.NET Azure Active Directory multi-tenant template, you see in Visual Studio.

Registering an application in AAD as a multi-tenant application allows other AAD administrators to sign up and start using our application. Considering the fact that Minion Docs is an AAD application there 2 primary ways that VTech can use Minion Docs.

  • Sync Local AD with AAD along with passwords – allows users to single sign on using their Active Directory credentials even though there’s no live connection between local AD and AAD.
  • Federate the authentication to local AD – users can use the same Active Directory credentials but the authentication takes place in local AD.

The only significant different between the above two methods is, where the authentication takes place; in the AAD or in federated local AD.

Local AD synced with Azure Active Directory with passwords

VTech IT decides to sync their local AD with their AAD along with the passwords. And VTech AD administrator signs up for the Minion Docs and allows the permissions (read / write) to Minion Docs.

What happens here?

  • MassRover created and registered Minion Docs as a multi-tenant Azure Active Directory application in their Azure Active Directory.
  • VTech has their local AD which is the domain controller which had been used in the Minion Docs Intranet application.
  • VTech purchases an Azure Subscription and they sync their local AD to their Azure Active Directory along with the passwords.
  • VTech Azure Active Directory admin signs up for the Minion Docs application, during this process VTech admin also grants the permissions to the Minion Docs.
  • After the sign up Minion Docs will be displayed under the ‘Applications my company uses’ category in the VTech’s AAD.
  • Now a user named ‘tom’ can sign in to the Minion Docs application with the same local AD credentials.

Sign in Work Flow


Few things to note

  • Minion Docs does not involve in the authentication process.
  • Minion Docs gets the AAD token based on the permission granted to Minion Docs application by the VTech AAD admin.
  • Minion docs can request additional claims of the user using the token and if they are allowed Minion Docs will get them.
  • Authorization within the application is handled by the Minion Docs.

Local AD is federated using ADFS

This the second use case where the local AD is synced with the AAD but VTech decides to federate the local Active Directory. In order to do this, first VTech should enable ADFS and configure it. ADFS doesn’t allow any claims to be retrieved by default, so VTech admin should specify the claims as well.

Federated Sign in Work Flow

In the federated scenario the authentication happens in the local AD.

As an ISV Minion Docs is free from, whether the authentication happens in the customer’s AAD or in their local AD.

Tenant Customization

Anyone with the right AAD admin rights can sign up to the Minion Docs, but this is not the desired behavior.

The better approach would be during the first sign up we can notify the Minion Doc administrators with the tenant details and they can decide or this could be automated in subscription scenarios.

A simple example, consider Voodo is another customer who wants to use Minion Docs. The Voodo admin signs up and before adding Voodo as an approved tenant in the Minion Docs database they have to complete a payment. Once the payment is done Voodo will be added to the database. This is very simple and very easy to implement.

Azure Key Vault Manager

Azure Key Vault is generally available. If you use Azure Key Vault in your projects, then there’s a high probability that you felt the need of a handy dev tool to manage your Vault.

Here it is. http://keyvaultmanager.azurewebsites.net

GitHub: https://github.com/thuru/AzureKeyVaultManager

More about Azure Key Vault: https://thuruinhttp.wordpress.com/2015/05/30/azure-key-vault-setup-and-usage-scenarios/

Azure Key Vault setup and usage scenarios

Introduction

At the time of this writing Azure Key Vault is in preview.  Azure Key Vault is a secure store solution for storing string based confidential information.

The reason I’ve mentioned that the string based confidential information is that you can store a key used for encrypting a file, but you cannot store the encrypted file itself as a file object; because some people have the confusion what could be stored inside the Key Vault.

Azure Key Vault – http://azure.microsoft.com/en-gb/services/key-vault/

Key Vault store 2 types of information

  1. Keys
  2. Secrets

Secrets– This could be any sequence of byte under 10 KB. Secrets can be retrieved back from the vault. Very much suitable for retrievable sensitive information like connection strings, passwords and ect. From the design point of view, we can either retrieve the keys every time we need or retrieve it once and store in the cache.

Keys – Keys could be imported to the vault from your existing vaults, also if your organization has Hardware Security Modules (HSM) you can directly transfer them to HSM based Azure Key Vault. Keys cannot be retrieved from the vault. For example if you store the key of a symmetric encryption which encrypts the files, you should send the files to vault ask the vault to encrypt / decrypt the data. Since keys cannot be retrieved from the vault this provides a higher isolation.

Keys could be stored in 2 different ways in the vault

  1. Software protected keys
  2. Hardware protected keys

Software Protected Keys – This is available in the standard tier of the vault. Compared to the Hardware protection this is theoretically less secured.

Hardware Protected Keys – HSMs are used to add premium hardware based circuitry secure storage for the keys. The most advanced key vault system available.


Provisioning Azure Key Vault

As Azure Key Vault is used to store sensitive information the authentication to the Azure Key Vault should happen via Azure AD. Let me explain it in simple steps.

  1. First a subscription administrator (either the service admin or co-admin) will create a Azure Key Vault using PowerShell.
  2. Then the admin registers an Azure AD application and generate the App Id and the App Secret Key.
  3. Admin grants the permission (trust) to the App to access the Key Vault using PowerShell.
  4. The subscription where the Vault is created should be attached to the Azure AD where the accessing app in the above step is created.
  5. This ensures that accessing app is an object of the Azure AD on which the subscription where the Vault is created is attached to.

Sometimes the 4th and 5th points might be bit confusing and you might face them especially when dealing with the multiple Azure subscriptions. See the below image for a clear picture.

Picture5

Assume that you have two subscriptions in your Azure Account, if you create the Vault in the Development subscription the app which can authenticate to the Vault should be in the Default AD. If you want to have the app in the Development AD you have to change the directory of the Development subscription.

Usage

Assume MassRover is a fictional multi tenant application on Azure.

ISV owns the Azure Key Vault

Scenario 1 (using secrets to for the encryption) – MassRover allows users to upload documents and it promises high confidential data security to its tenants. So it should encrypt the data at rest. MassRover uses it’s own Azure Key Vault to store the secrets (which are the encryption keys).  A Trust has been setup between the Azure Key Vault and MassRover AD client application. MassRover Web App authenticates to the Azure Key Vault retrieves the secrets and performs the encryption / decryption of the data.

Picture1


Scenario 2 (using keys) – MassRover Azure Key Vault stores the keys which cannot be retrieved out of the Vault. So the web app authenticate itself with the Vault and sends the data to the Vault to perform the encryption of decryption. This scenario has higher latency than scenario 1.

Picture2


Tenant owns the Azure Key Vault

Tenants can own their Key Vault and give access to MassRover by sharing the the authorized application Id and application secret. This is an added benefit if the tenants worry about ISVs keeping the keys in their subscription and administrative boundary. Tenant maintained Key Vaults give additional policy based security for sure but latency is high since data transfer has to happen across different wires. (this could be solved to certain extent if the tenant provisions the Key Vault in same region).

Tenant maintained Key Vault also has 2 scenarios explained above, as either to go with the secrets or go with the keys.

Scenario 3 (using secrets)

Picture3

Scenario 4 (using keys)

Picture1


Useful links

Azure Key Vault NuGet packages (at the time of this writing they in pre release stage : http://www.nuget.org/packages/Microsoft.Azure.KeyVault/

PowerShell for provisioning Azure Key Vault and .NET code sample : https://github.com/thuru/AzureKeyVaultSample

Channel 09 – http://channel9.msdn.com/Shows/Cloud+Cover/Episode-169-Azure-Key-Vault-with-Sumedh-Barde

AWS Best login practice – IAM Policies

This post explains the best practice that highly recommended to be followed in AWS account and the Identity Access Management (IAM) policies in login process.

First the user account that is used to create the AWS account is the Root Account. (the composite credential of email address and password). For example if I go to AWS portal and submit email address thuru@qbe.com and the password along with credit card payment details, this account or the credential holder becomes the Root Account.

It is not recommended to use the Root Account for any purposes even to login to AWS portal. (unless required in very specific scenarios like changing core account details and payment methods)

The best practice is to create an IAM user with administrator privileges. IAM administrator has all the privileges except the core account privileges mentioned above. You can use the built it IAM administrator template for this.

Follow these steps.

  • First login to the portal as AWS Root User (as in the beginning Root User is the only one who has privileges to create Administrators). Root user will go to https://console.aws.amazon.com/console/home and enter email and password to login to the portal. You can note that this is a global URL for all AWS users all over the world.
  • In the portal go to under Administration & Security section click on IAM image
  • Go to users and click create users. Name the user (ex – admin) and you can generate key for the user in order to access AWS services via APIs. It’s not recomended to use admin account for development purposes so better not to generate keys for admin. Click create to create the user.image
  • By default the users do not get any permissions. In order to assign permission, click on admin (the user created in the above step will appear in the users grid). Under the permission tab click on attach policy.image
  • First option is Administrator Access policy. Click on that to assign it and click Attach Policy button.image
  • Then back in the page under Security Credentials section click on Manage Password to create a password for the admin.image
  • There you can auto assign a password or can assign a custom password. You also get the option to make the user to change the password in the first login.
  • You also have the option to specify MFA (will post a separate blog on this topic)
  • Now go back to the IAM Dashboard and you will see a section like this.image
  • This is the IAM user sign-in link. You can click customize and replace the number in the URL to some alias (your organization name). And this URL should be used by IAM users including the admin in order to access AWS web console.

image


Root user account and the global sign-in URL should be untouched unless a specific requirement.

Azure Blob Storage Data Security

The question of security and cloud computing is one of the very well argued discussed and debated topic. It’s also one of the very common question I get in my sessions.

What ever said and done I personally believe that talking about security regardless of in the cloud or not it has 2 major characteristics.

  1. Security is a policy based feature
  2. Security is a shared responsibility

Ok, leaving the arguments of security, let’s jump into the Azure blob storage data security.

What would be the concerns of data security in Azure Blob storage

  1. How much secure the Azure data centers are ?
  2. What is the security for the data in transit ?
  3. Does Microsoft look or access my data stored in Azure Blob ?
  4. What are the policies should I follow in order to store data securely in Azure Blob ?

Let’s discuss each point one by one

How much secure the Azure data centers are ?

If you’re concerned that Azure data centers aren’t secured enough that physical security breach easily be possible, then you are not going to use the Azure in the first place. And there are tons of articles and videos in the Internet explaining the data center security features of Microsoft Azure.

What is the security for the data in transit ?

All the communications with the Azure and also within different data centers in Azure happen via https so it’s secured via TLS. There are some services which can be accessed (blob service included) with the http but by default this is turned off and it is not recommended to turn it on unless specifically required.

Does Microsoft look or access my data stored in Azure Blob ?

The direct answer from Microsoft is No, and indeed it’s true to my knowledge. But as per in the agreement Microsoft might collect the telemetry data of your blob storage  in terms of billing, usage patterns and service improvement parameters.

What are the policies should I follow in order to store data securely in Azure Blob ?

All your cooperate policies that you apply on premise and also additional policies that you have defined in your organization to store the data outside the cooperate firewall should be applied when using Azure Blob storage. But this is very unique and different to each company.

With all that information Why do you need to encrypt the data at rest from any public cloud provider ?

This is a question I ask from the customers when they request me to encrypt the data. Of course there’re several reasons mostly it is due to the cooperate policies which state any data at rest outside the cooperate firewall should be encrypted and also there’re cooperate policies that define the data should be in a specific political and geographic boundary. This is another concern in architecting the applications and selecting appropriate redundancy policies.

Other than the above reasons some customer have complained that we want to protect the data from our public cloud service provider, and prevent them reading the data. This is acceptable for some extent but again this raises plenty of other arguments like how and where to keep the encryption keys and how to secure them.


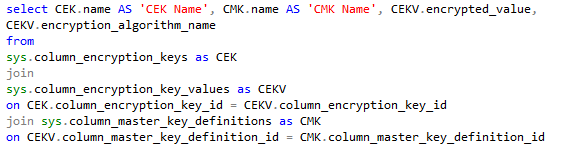
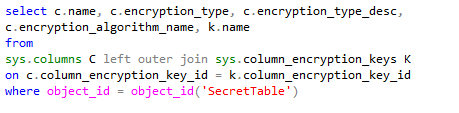
Encrypting data at rest in Azure Blob Storage

Azure blob storage does not provide any inbuilt mechanisms to encrypt the data at rest. We have to handle this in our application.

First selection of the encryption is very important. Since we’re talking about encrypting the data at rest symmetric encryption serves the purpose well, we do not need to put asymmetric encryption and overwhelm the situation.

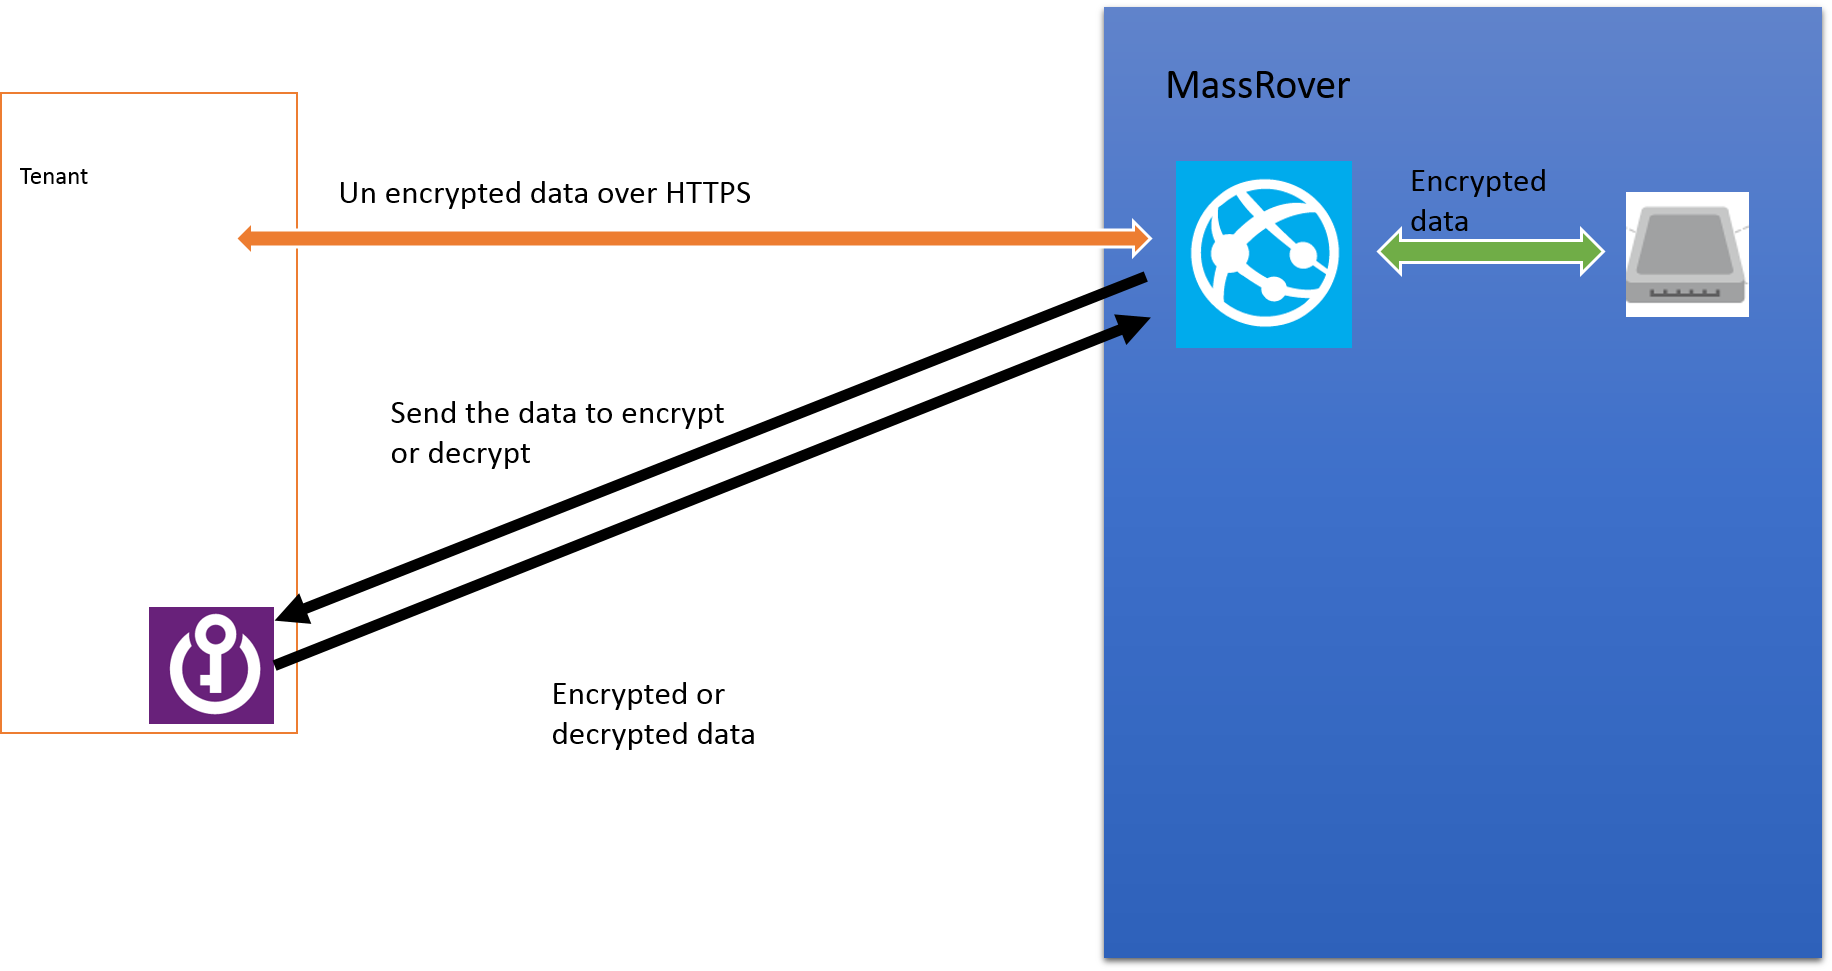
Second where to keep the private keys – In most of the application design scenarios keeping the private keys in a database either encrypted or unencrypted format is a common practice. If you’re encrypting your private keys then you should have a master key.  You can design your own key management policy for you application or use Azure Key Vault for the key management which is still in preview.  One of the concerns I’ve been researching is having an algorithm as a master key which can create master keys for given parameters and handles master key expiration policies this will help us from the problems of persisting keys. (will write another separate post about this)

Third we should be aware when and how to apply the encryption – As the best practice always encrypt and decrypt the memory streams of your blobs. So you ensure that data is encrypted before hitting the disk.

In a web application encryption and decryption happens in the web server. The following diagram explains a scenario where there’s a web app and a blob storage in place and how encryption/decryption happens for the data at rest.

blob encryption diagram

Azure encryption extensions is a great library (https://github.com/stefangordon/azure-encryption-extensions)

Nuget – Install-Package AzureEncryptionExtensions


Performing the encryption and decryption in the stream helps to protect the data before it hits the disk. See the code below.

You can access the sample code with Web API service for upload and download content to Azure blob storage with symmetric encryption from my git repo

https://github.com/thuru/azurestorageencryptionsample