Service mesh in Service Fabric

Introduction

Microservices is here to stay and we can witness the increasing popularity and the maturing technology stack which facilitate microservices. In this great article which explains about the maturity of microservices and the 2.0 stack, it mentions three key aspects.

  1. Service mesh
  2. Matured orchestrators
  3. RPC based service protocols.

This post focuses on the communication infrastructure in Service Fabric. Service Mesh is about the communication infrastructure in a microservices / distributed system platform.

First, let’s look at What is a service mesh ?  In the simplest explanation, service mesh is all about service to service communication. Say, service A wants to talk to service B, then Service A should have all the network and communication functionality and the corresponding implementations, in addition to its business logic. Implementation of the the network functionality makes the service development complex and unnecessarily big.

Service mesh abstracts all or the majority of the networking and communications functionality from a service by providing a communication infrastructure, allowing the services to remain clean with their own business logic.

So with that high level understanding if we do some googling and summarize the results, we will have a definition of a service mesh, with these two key attributes.

  • Service mesh is a network infrastructure layer
  • Primary (or the sole) purpose is to facilitate the service to service communication in cloud native applications.

Cloud native ?? – (wink) do not bother much on that, for the sake of this article, it is safe to assume a distributed system’s service communication.

imgpsh_fullsize

Modern service mesh implementations are proxies which run as sidecar for the services. Generally an agent runs on each node and the services run on the node talk to the proxy and proxy does the service resolution and perform communication.

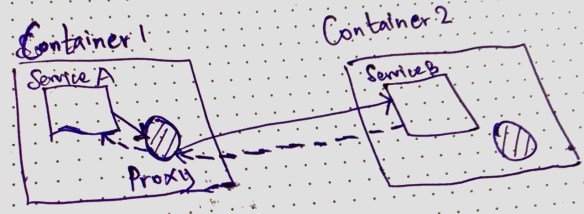
When Service A wants to talk to Service B

  1. When service A calls its local proxy with the request.
  2. The local proxy perform service resolution and makes the request to Service B
  3. Service B replies to the proxy running in Container 1
  4. Service A receives the response from its local proxy
  5. Service B’s local proxy is NOT used in this communication. Only the caller needs a proxy not the respondent.
  6. Service A is NOT aware of service resolution, resiliency and other network functionalities required to make this call.

There are notable service mesh implementations in the market, Linkered and Istio are quite famous and Conduit is another one and many more in the market. This is a good article explaining those different service mesh technologies.

The mentioned service mesh implementations are known in the Kubernetes and Docker based microservices, but what about service mesh in Service Fabric. 


Service mesh is inherent in Service Fabric

Service Fabric has a proxy based communication system. Defining this as a service mesh is up to the agreed definition of service mesh. Typically there should be a control plane and data plane in a service mesh implementation. Before diving into the details of it, let’s see the available proxy based communication setup in Service Fabric.

Reverse Proxy for HTTP Communication

SF has a Reverse Proxy implementation for HTTP communications. This proxy runs an agent in each node when enabled. This reverse proxy handles the service discovery and resiliency in HTTP based service to service communication. If you want to read more practical aspect of the Reverse Proxy implementation, this article explains the service communication and SF reverse proxy implementation.

Reverse Proxy by default runs on port 19081 and can be configured in the clusterManifest.json


{

............

"reverseProxyEndpointPort": "19081"

............

}

In the local development machine this is configured in the clusterManifest.xml

<HttpApplicationGatewayEndpoint Port="19081" Protocol="http" />

When Service A wants to call the Service B’s APIs, it calls its local reverse proxy with a following URL structure.

http://localhost:{port}/{application name}/{service name}/{api action path}

There are many variations of reverse proxy URLs should be used depending what kind of a service the calls are made. This is a detailed article about Service Fabric Reverse Proxy.

RPC Communication in Service Fabric

RPC Communications in Service Fabric are facilitated by the Service Fabric Remoting SDK. The SDK has the following ServiceProxy class.

Microsoft.ServiceFabric.Services.Remoting.Client.ServiceProxy

Service Proxy class creates a lightweight local proxy for RPC communication and provided by the factory implementation in the SDK. Since we use the SDK to create the RPC proxy, in contrast to the HTTP reverse proxy this has the application defined lifespan and there’s no agent runs in each node.

Regardless of the implementation both the HTTP and RPC communication are well supported by Service Fabric by native and has the sidecar based proxy model implementation.


Data Plane and Control Plane in Service Fabric

From the web inferred definition of service mesh, it has two key components, (note, now we’re talking the details of service mesh) known as data plane and control plane. I recommend to read this article which explains the data plane and the control plane in service mesh.

The inbuilt sidecar based communication proxies in Service Fabric form the network communication infrastructure : which represents the data plane component of the service mesh. The sidecar proxies in Service Fabric form the data plane. 

Control plane is generally bit confusing to understand, but in short, it is safe to assume  control plane has the policies to manage and orchestrate the data plane of the service mesh.

In Service Fabric, control plane is not available as per the complete definition in the above article. Most of the control plane functions are application model specific and implemented by the developers and some are in built in the communication and federation subsystem of Service Fabric. The key missing piece in the control plane component of Service Fabric is, the unified UI to manage the communication infrastructure (or the data plane).

The communication infrastructure cannot be managed separate to the application infrastructure, thus a complete control plane is not available in Service Fabric.

With those observations, we can conclude:

Service Fabric’s service mesh is a sidecar proxy based network communication infrastructure, which is leaning much on the data plane attributes of a service mesh.

Advertisement

Dependency Validation Diagrams do not work in ASP.NET Core / .NET Core

Introduction

Dependency validation helps to keep the code architecture clean and rules enforced. The video below gives a quick introduction to the dependency validation in Visual Studio.

Recently a friend, asked about enforcing constraints in a project architecture, I explained this to him. But I haven’t used it any of my previous projects (we’re good developers who do not spoil the code :P) , so thought of giving it a try. As shown in the video things should be straight forward but I ended up my validations never kicked in.

With some investigation, I found that when we add the DV project to the solution it adds the following package to all the projects.

Microsoft.DependencyValidation.Analyzers

If your project is made out from a .net core / asp.net core project template then it fails to install the above NuGet package and obviously the validation does not work.

How to fix this ?

I created a ASP.NET Core project based on .NET Framework (same applies to .NET Core as well). Added some class libraries and draw a following dependency validation layered diagram.

Layered Diagram

Red one is the web project (asp.net core) and others are simple class libraries. The structure is not complex. Just to check the validation, I referenced the DataContext in the web project as below.


public void ConfigureServices(IServiceCollection services)
{
services.AddMvc().SetCompatibilityVersion(CompatibilityVersion.Version_2_1);
// This is right
services.AddSingleton<IProductService, ProductService>();
// this is wrong and DV should fail
services.AddSingleton<IMyDbContext, MyDbContext>();
}

But the validation never fired.

In order to do get this work.

  • Install the following NuGet in the ASP.NET Core / .NET Core template based projects in the solution. Other projects have it installed automatically when we add the DV project.
Install-Package Microsoft.DependencyValidation.Analyzers -Version 0.9.0
  • Open the ASP.NET Core template project file. Add the following. line numbers 15-18 should be manually added to include the DV diagram in the asp.net core web project.


<Project Sdk="Microsoft.NET.Sdk.Web">
<PropertyGroup>
<TargetFramework>net471</TargetFramework>
</PropertyGroup>
<ItemGroup>
<Folder Include="wwwroot\" />
</ItemGroup>
<ItemGroup>
….
<PackageReference Include="Microsoft.DependencyValidation.Analyzers" Version="0.9.0" />
<AdditionalFiles Include="..\DependencyValidation\DependencyValidation.layerdiagram">
<Link>DependencyValidation.layerdiagram</Link>
<Visible>True</Visible>
</AdditionalFiles>
</ItemGroup>
<ItemGroup>
<ProjectReference Include="..\LayeredProject.DataContext\LayeredProject.DataContext.csproj" />
<ProjectReference Include="..\LayeredProject.Services\LayeredProject.Services.csproj" />
</ItemGroup>
</Project>

After this all set with one small problem. Now, when we build the project, the validation kicks and the build will fail.

But the error response from Visual Studio is not consistence. It will always fail the build – that’s 100% expected behavior and it is right. But sometimes the error only appears in the Output window and not in the Error List. Also, sometimes the red squiggly does not appear.

This happens because the ASP.NET Core / .NET Core project templates do not support the DV, we did a workaround to make it work and it has some links broken to display the error message in the Error List, I hope soon Microsoft will add support to the DV in ASP.NET Core and .NET Core based project templates.

You can check  / reproduce this, using the following two branches. The ‘normal’ branch has problem and the ‘solved’ branch is patch applied.

https://github.com/thuru/aspnetcore-dv/tree/normal

https://github.com/thuru/aspnetcore-dv/tree/solved

Used tooling

  • VS 2017 Enterprise (15.7.4)
  • ASP.NET Core 2.1
  • .NET Framework 4.7.1


HttpResponseMessage vs IHttpActionResult

In Web API 2 IHttpActionResult is introduced. Read this post which explains the Web API 2 response types and the benefits of IHttpActionResult

Assuming you’ve read the above article it is recommended to use IHttpActionResult.

Apart from the benefits of clean code and unit testing the main design argument of using IHttpActionResult is the single responsibility principle; stating that actions have the responsibility of serving the HTTP requests and should not involve in creating the HTTP response messages. This argument makes sense, but keeping this aside if we look at the implementation of IHttpActionResult it calls the ExecuteAsync method to create the HttpResponseMessage object.

But overall it is new, easy to perform unit testing and a recommended practice to use IHttpActionResult. I personally prefer IHttpActionResult due to clean code and the ability to write neat unit tests.

Still HttpResponseMessage provides more control over the HTTP response message sent across the wire, do we have that control in IHttpActionResult especially the HTTP response message creation is hidden from us.

Yes you can get the full control. Because in the above article it’s mentioned that ExecuteAsync method is called in the pipeline in constructing the HTTP response. So the solution is simple we should have a custom type which implements IHttpActionResult interface and provide the logic for for creating the HttpResponseMessage object.

This github repo has the code for a generic type which implements IHttpActionResult. Which you can use or extend; in the sample I have provided how to implement caching in the response header.

The main class is CacheableHttpActionResult<T>

Generating code using System.CodeDom

Get the code sample for this post git

We face several occasions that we need to generate code by automation. Several tools do exist in order to automate the code generation. In this article I discuss about the System.CodeDom which is part of .NET SDK.

CodeDom is designed in the provider model and it gives the flexibility to initiate with the desired .NET language, so we can create the code generation algorithm and ask CodeDom to generate the code in different languages like C#, VB or C++.

Place these using statements before begin.

image


You can get the list of languages supported by the CodeDom provider from this code. Output will contain different names for same language (like csharp and c#)

image


CodeNameSpace is the core object which wraps the entire code generation logic.


Create a namespace, include some imports and adding comments.

image 


Declare a class and add a property to the class.

image


Like above CodeDom also provides methods to create private variables, constructors, methods, attributes and even logic inside methods. The downloadable sample has demonstration for all the features.

After adding all the required elements for the code we can add the types to the namespace.

image


Once the namespace is created we have to generate the code, here the CodeDom magic works. In order to generate  the code we should use the following method

CodeDomProvider.CreateProvider(“language“).GenerateCodeFromNamespace(codeNamespace, textWrtier, codeGeneratorOptions)

Creating the CodeGeneratorOptions

image


Then you can pass any TextWriter object, here I’ve used StreamWriter and generating a physical file. Compact code in my fashion.

image


Sample contains code for

  • generating constructors
  • creating .NET 4.0 type parameters
  • private properties
  • methods
  • adding attributes
  • adding methods
  • adding code inside the methods.

Get it from github

How to create custom NuGet packages

NuGet provides an easy and a very efficient solution to distribute packages. A NuGet package can contain assemblies, content files and other tools that you want to distribute. A NuGet package is described by a manifest file known as nuspec. View the nuspec reference.

You can use 3 sub folders \lib \content and \tools in the NuGet package structure. \lib is used to store the assemblies, \content folder is used to store scripts, images, style sheets, ect… and finally \tools folder contains power shell scripts which mostly handle the package events (installation of the package, un-installation of the package)

\content folder also contains the transformation files which apply changes to files such as web.config and app.config. NuGet packages can also be used to insert code and create code files.

You can create NuGet packages either using visual designer or command line. In order to use the command line, we need NuGet.exe which can be downloaded from this link.

Open CMD and go to NuGet.exe path (or you can add the NuGet.exe path to environment variable to access it from anywhere)

Type the following command to make sure that you’re running the latest version of NuGet.exe

NuGet Update –self

Then we have to create the nuspec for the package. Create the above mentioned 3 folders and copy the assemblies inside the \lib. You can have sub folders inside the those folders. For example you can have \content\images to store images and when your package is referenced it will create a folder named ‘images’ in the project.

After setting up the file and folder structure, run the following command to create the nuspec file.

nuget spec

This will create the nuspec manifest file with tokens for the parameters like author, owner, description, urls and ect. Open this nuspec file and enter those details. A sample nuspec file looks like this.

   1: <?xml version="1.0"?>

   2: <package >

   3:   <metadata>

   4:     <id>Package</id>

   5:     <version>1.0.0</version>

   6:     <authors>Thuru</authors>

   7:     <owners>Thuru</owners>

   8:     <licenseUrl>https://thuruinhttp.wordpress.com</licenseUrl>

   9:     <projectUrl>https://thuruinhttp.wordpress.com</projectUrl>

  10:     <iconUrl>http://ICON_URL_HERE_OR_DELETE_THIS_LINE</iconUrl>

  11:     <requireLicenseAcceptance>false</requireLicenseAcceptance>

  12:     <description>Package description</description>

  13:     <releaseNotes>Summary of changes made in this release of the package.</releaseNotes>

  14:     <copyright>Copyright 2014</copyright>

  15:     <tags>Tag1 Tag2</tags>

  16:     <dependencies>

  17:     </dependencies>

  18:   </metadata>

  19: </package>

Once the nuspec file (consider the name is mypackage.nuspec) is created, you can create the NuGet package. Run the below command to create the NuGet package

nuget pack mypackage.nuspec

This will create the NuGet package. You may get errors and warnings based on some values in the nuspec.

This the structure used. (Note here I’ve copied the NuGet.exe in my working folder because I didn’t set the environment variable)

image

Windows Azure Caching

Role Based Caching

Windows Azure provides 2 primary role based caching options. Shared caching and Dedicated caching.

Shared Caching is defining a portion of the memory of the web or worker role. This does not include additional charges since you’re already paying for the cloud service instance and using the portion of the memory. This might be a performance hit when the cache size is significantly bigger portion of the total instance memory allocation. Shared caching is also known as In-Role caching and Co-Located caching. The name In-Role caching is self explanatory.

Dedicated caching is again a very self explanatory term, this enables us to have a dedicated Cache Worker Role.

In-Role Caching

This is the cache type we provision inside our role instance. Create a Windows Azure cloud service project and 2 roles. (one Web role and one Cache Worker role).

image

Right click on the WebRole1 and go to properties.

image

Tick Enable Caching, also notice that Dedicated Role option is disabled since this is a Web Role. You can specify the amount of cache size in percentage. You can notice that it says Cache Cluster settings. This is because Azure roles can run on more than one instance when the role runs on more than one instance this forms the cache cluster. A cache cluster is a distributed caching service that combines all the memory from all the running instances.

Each cache cluster maintains the runtime state in the Azure storage. You should provide a valid storage account information in the text box when deploying the solution to Windows Azure.

Named Cache Settings is the last section. Each cache cluster can have more than one Named Cache. This is a logical partition of the cache memory with different settings. You can see the different settings we can configure for each named cache. Eviction policy LRU means Last Recently Used.


Dedicated Caching

The below screen explains the dedicated caching. You can see that Dedicated Role is enabled and also you have the option of using the dedicated role as a co-located cache by specifying the amount of memory in the percentage. This is useful when you plan a strict resource framed deployment.

image


Windows Azure Caching Service

Other then the above role based cache service Windows Azure provides a Cache Service which is in preview.

image

The cache offering is available in 3 different packages. Basic, Standard and Premium. The good side of these offerings is that each of them can be scaled with in a range. Once you provision a cache service you get the endpoint URL and security keys.

image

In the Azure management portal you get other options like dashboard, configuration options to create named cache instances and scaling options.


Accessing Windows Azure Cache Service in a .NET application

First install the Windows Azure Cache assembly from NuGet.

image

This adds some configuration settings to your config file as well. This is where you specify your endpoint URL and the security key.

image 

The programming model is simple and straight forward. We can use the DataCache class in Microsoft.ApplicationServer.Caching to access the cache. This is the same class we use in accessing the role based Windows Azure Cache as well.

A very crude code sample.

   1: static void CacheTest()

   2: {

   3:     var cache = new DataCache("default");

   4:     Console.WriteLine(cache.Name);

   5:  

   6:     cache.Add("key", "12");

   7:  

   8:     var value = cache.Get("key");

   9:     Console.WriteLine(value);

  10: }

MSDN link for the Windows Azure Cache (Preview) Development.

ObjectCache – Caching

In the ASP.NET domain all the state mechanisms can be considered as caching, both in the client side (view states, query strings, cookies) and in the server side (application state, session state and the Cache object itself.) You can define the classes and properties as static to get the effective functionality of caching. In ASP.NET the Cache object is HttpContext.Cache and .NET 4 introduced the ObjectCache to be used in non ASP.NET applications. This post will walk you through about the ObjectCache.    Learn about Windows Azure Caching.

ObjectCache

This is included in the System.Runtime.Caching assembly. MemoryCache is the concrete implementation of this library. The following method provides a quick glance on how ObjectCache can be used.

   1: public static void PutInCache(string key, object value)

   2: {

   3:     

   4:     var cache = MemoryCache.Default;

   5:     var policy = new CacheItemPolicy()

   6:     {

   7:         AbsoluteExpiration = new DateTimeOffset(DateTime.Now.AddMinutes(5)),

   8:         Priority = CacheItemPriority.Default

   9:     };

  10:  

  11:     Console.WriteLine("Cache Size for the application in MB - {0}", cache.CacheMemoryLimit / ( 1024 * 1024) );

  12:     Console.WriteLine("{0}% cache memory is used.", (100 - cache.PhysicalMemoryLimit));

  13:  

  14:     cache.Remove(key);

  15:     

  16:     cache.Add(key, value, policy);

  17:  

  18:     int result = (int) cache.Get(key);

  19:     

  20: }

CacheMemoryLimit property gives the allocated cache memory for the specific instance of your application, where as PhysicalMemoryLimit give the unused space of the cache in percentage. When the cache memory  reaches beyond the CacheMemoryLimit then cache values are removed automatically, we can track this and take actions by registering a callback for the cache item removal.

Cache have 2 types of expiration policies. AbsoluteExpiration is the definite time after which there’s no guarantee for the item to be available in the cache memory, SlidingExpiration is where if there’re no access to the particular cache item within the specified time period there’s no guarantee for that item to be available. These 2 are very common and available in the HttpContext.Cache as well.

Cache has a priority which takes the value of the CachItemPriority enum. This enum has 2 values Default and Not Removable. Default is the default set up, means when you do not mention any value this would be applied. Default ensures the default behavior of the cache. Not Removable is used to instruct the system not to clear the values from the cache even when the system runs low in memory. These values should be cleared explicitly.

Windows server 2008 Core doesn’t support the ObjectCache and some Itanium implementations also do not support ObjectCache. Windows Server 2008 R2 with SP1 and later versions (including Windows 8.1) support ObjectCache.

Few good to know features of Entity Framework

I have been doing some reading about advance EF features for last couple of weeks and got to know some interesting things, this post is a compilation of the information and provides links to the relevant sites.

Starting with EF 5.0 ObjectContext was replaced with DbContext. So what’s the difference between ObjectContext and DbContext ?

This link gives the simplest answer for the above question. And using the following code you get the ObjectContext from your DbContext. Say that your have model class named MyEntities the best practice is to create a partial class (partial classes are the safest way since the auto generated classes could be overridden at any time there’s a code regeneration) and create a property that returns the ObjectContext. The below code describes the idea.

   1: public partial class MyEntities : DbContext

   2: {

   3:     public System.Data.Entity.Core.Objects.ObjectContext ObjectContextProperty

   4:     {

   5:         get

   6:         {

   7:             return ((IObjectContextAdapter)this).ObjectContext;

   8:         }

   9:     }

  10: }


Compiled Queries

Compiled Queries are helpful when we want to squeeze the final drop of performance from our application. We cache the TSQL statement which is produced from LINQ to Entity queries we write. Since we write the queries in LINQ these queries first get translated into TSQL statements and they’re executed against the SQL Server. As a result of caching the TSQL statements of the LINQ queries we cut down the translation time. Microsoft has mentioned this provides 7% performance improvement. Details here

This article provides information on creating compiled queries

MSDN Compile Query Class

The reason why I haven’t mention any samples here is that we do not need to worry much about the query compilation in EF 5.0 and above because it automatically happens.

This MSDN blog post explains the automatic query compilation in EF 5.0 and above. But again if you want to have more advanced and granular control over the compilation you should consider implementing your custom compiled queries. It’s better to have the compiled queries in your data repository classes.

Performance

Read this Data Access Blog article about the EF 5.0 performance. The below image take from the blog gives a summary.

image 

As you see that updating to EF 5.0 on .NET 4.5 gives a greater performance boost to LINQ to Entities, automatic query compilation is one of the main features for this performance gain.

EF Versions – http://msdn.microsoft.com/en-us/data/jj574253

This channel 9 video is a good one about EF 5 and EF 6

 http://channel9.msdn.com/Shows/Visual-Studio-Toolbox/Entity-Framework-5-and-6