We are living in a very unusual time, in fact, personally, 2020 is the most challenging year thus far, and I see the reflections of it in my business and personal life. But times are filled with transformational opportunities rather than allowing us to sharpen the same old knife again and again.
At Aventude Spark-E, we are working with some interesting social distancing induced business cases, and one aspect exciting to me is building architecture & social distancing. It was a request from one customer to obtain technical advisory on how to augment the existing evacuation planning simulations to map social distancing. If you haven’t heard about evacuation planning simulations, simple googling will help, it is a well-established agent-based simulation to study and aid evacuation planning at an event of a catastrophe.
We started it with matching eye-contact based simulation (I was surprised when I saw it first), and it seemed to work well. However, the critical issue is, these simulations are expensive and often loaded as part of pricy software. Also, this software need specialized hardware and processing. Those reasons didn’t map well when we did cost curve analysis for a SaaS application.
Either we have to reduce the cost of the implementation or augment the problem statement to attract the investors and expand the audience. Second option seemed more feasible than first, but how to make it to the mass audience. An idea came across the table, why don’t we make it a standard and we will put social distancing index for each building, that every building has to do it and qualify this index.
An engineering simulation soon became a standardization business – in the back of my head I was thinking, ok, this is how standards are born lol. We gave that task to someone who’s specialized in that area, and started thinking about how to bring more crispy use cases.
At this stage, we were working mostly at the conceptual level or thought leadership level as our PR team prefers that way (wink). Whether the social distancing index would fly or not, the requirement to modify existing buildings and their interiors is a fascinating use case. Most businesses are facing a struggle on how to bring the customer back; it is not enough for them to show they cleaning shoes and tables every hour. Something has to structurally convincing for people to feel safe, because we are fighting against an invisible enemy.
We did some R&D with Revit with a structural engineering designer from customer side, who helped us to do standard simulations and interior basics. The eye contact simulation which already exist, we thought to tap into it and see how things can work together.
The prototype, seemed to be working well.
Revit Python SDK is used to study the existing CAD drawing of a building structure
It plays a simulation in encode base to identify the eye-contact rate at a given occupancy rate – there are suggestions to use ray-tracing simulation and lighting as well, but we haven’t tried it yet.
Revit layer to suggest interior changes to reduce the eye contact rate, which is mapped to the social distancing index.
#3 is challenging but doable; the real challenge is suggesting a building architecture with meaning and taste. Say if you’re a coffee shop, the algorithm should know what are the possible things to put in and re-arrange things in a way that are relevant to your business. It is entirely different from modelling a library. This is the super end goal, but will not be part of the initial release, or it may be available as a preview feature for a particular segment of buildings.
Leaving the details, this is a compelling case in terms of how we are trying to address a creative industry and applying AI to augment it. At this level, a complete AI would be very expensive (or a better way to put it; we still do not know how to make it cost-effective). Now the model suggests the structural elements. These models are more structural that they do not possess aesthetic value; that’s where human creativity and emotion play a role. It is not a real-time human to AI interaction; the baby steps are in more of a guiding mechanism for the designers.
I love to see an AI, that re-models an interior of an existing building, we send a drone or something to capture the building model, and it suggests changes with minimal investment with the current stuff adhering to the preferred choices of interior design.
Of course, I do not prefer much to write about COVID-19, but enticement on the technology does not leave me silent either. In the last post, I managed to cover a holistic view of contact tracing apps, especially how to separate the PII data and analytical.
This week Apple announced its new update iOS 13.5 beta 2, usually I do not go for with the beta updates, but this is a particular case and downloaded the beta with the beta profile.
Little fascination is Apple has taken a similar step, as explained in my post. Fully anonymized and random Ids. Apart from that, these are things to note :
Any app to use the Exposure Notification APIs, the app publisher should prove their identity to be an authorized government entity; this will be a cumbersome step to pass, as I understand.
Though Exposure Notification API is available in the update, the user cannot switch on the feature without an authorized app installed in the device.
Refer to the images below.
I made this short post to highlight two things.
Independent entities who are developing the contact tracing apps, should consider this new update and the acceptance criteria. Since the new Exposure Notification API has been released, Apple may not accept the standard Bluetooth tracing apps like the ones we saw in the last post.
The Contact tracing app developers, should pass a clearance from the respective governments to get the apps approved in the App Store
If you’re developing such an app, it’s high time to consider to use the Exposure Notification APIs.
Contact Tracing Apps are one of the most argued topics these days. Several countries are trying to implement contact tracing apps. Google & Apple announced a joint partnership in enabling contact tracing; it is a two-step approach – first it will be released as an interoperability API, later as a platform level functionality. At the same time, countries like China and Singapore have implemented contact tracing apps including location-based services, this is proven to be effective, compared to Bluetooth based tracing. However, location-based tracing is not widely accepted due to the obvious privacy concerns.
Advertisements
Bluetooth based contact tracing
These applications use Bluetooth to detect who’s around you. Gathered information is then processed either in real time or based on an action. In Sri Lanka there are several projects emerging from different individual developers. Also, there are entities who are trying to implement this solution for the government. We were asked to provide clarity and some working building blocks, to understand the internals of a typical tracing app. This post contains some of the observations and concerns of a contact tracing app from a general perspective.
These kinds of apps trigger concerns of data privacy and related issues (more on this below), but first thing came to my mind was how to do this in iPhone, as iPhone has restrictions in unpaired Bluetooth communication – it requires the app to be in foreground for a successful handshake – you can read more about the limitation from this link
Here are the screen shots of the app in an iPhone (click to enlarge the images). It is obvious, the app should run in foreground to function properly.
Advertisements
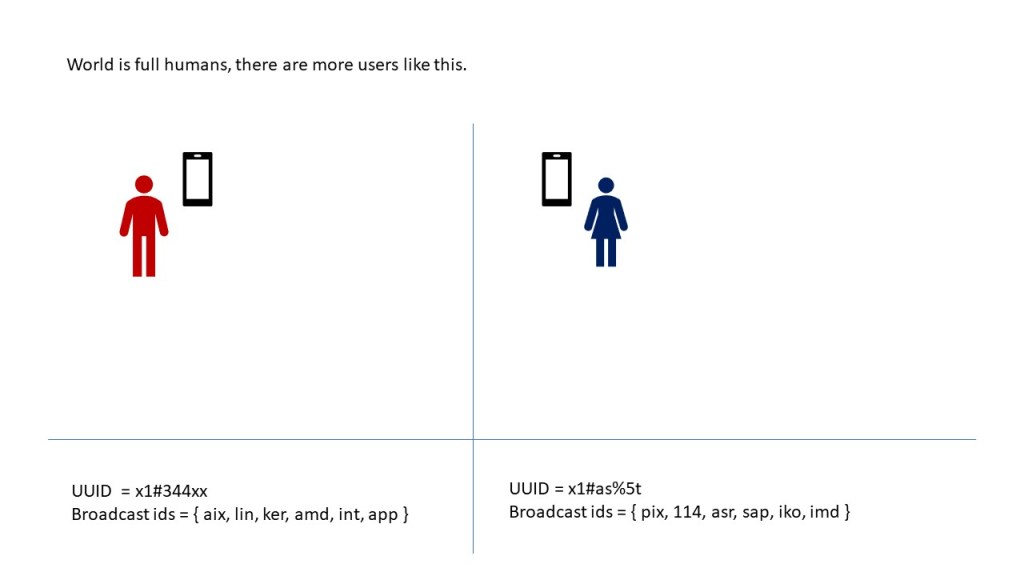
Minimal PII Footprint Implementation
Second concern is data, mainly the PII – Personally, Identifiable Information. PII has a broader data coverage, addition to the obvious data like phone number, email, name, IP address etc.
PII classification and severity vary broadly, which makes it hard to comprehend at times. Couple of interesting examples of PII are, In EU under GDPR, a drawing of a child is a PII as it may reveal the social and environmental impact of a kid’s surrounding. An advertisement put out to sell a car is a PII – not only because you forgot to mask the number plate, because the selling price can be used to inference the financial status of the person at a given time.
With that, note, let us look at how we can implement a contact tracing app with minimal PII footprint. In fact, we can have a contact tracing app with zero PII stored in the systems. Initial validations require a phone number or an email.
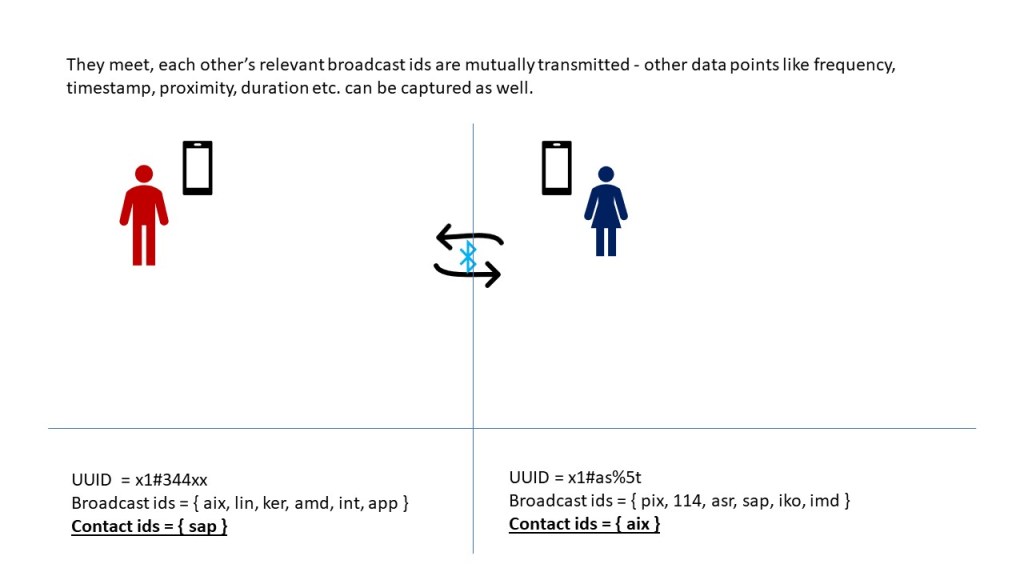
User installs the app, enters mobile number, receives one-time password and register. The mobile number is not stored in the systems, it is used to send the one-time password and then wiped off. System generates an id (UUID) like a username and the push notification id will be mapped against this id. For the system UUID is the user, it has no meaningful mapping to the real person of the UUID. The below deck illustrates how the contact tracing can happen in such case.
This is a fair solution in terms of data privacy, as no PII is persisted in the contact tracing app provider’s systems. However, reaching people is challenging as system relies only on push notifications. Storing mobile number removes this obstacle and eases up the process.
In mapping the UUID to the real person, phone number is preferred because phone communication is more effective in reaching a person at emergency over email. Also, with established policies, telecommunication services should provide APIs to related authorities to retrieve more data about a person based on the phone number.
Advertisements
Data related Concerns
An app of this nature, is a natural victim for concerns related to data, some key concerns would be
Data privacy – Discussing this limiting to this context, data privacy is about who will access my data and how they will use it. Will they use this to other purposes than tracing the infection. Will it be shared with others? In case of any findings related to me, will it be shared with others? if so with whom and how they will use it? As you see, data privacy is about how the data is used.
Data residency – The geographical location where data is stored. Public cloud or a private datacenter. Within the country or outside. Within a geopolitical region or outside. Within a specific standard datacenter or outside.
Data handling – This is very important aspect but often missed. This is the most crucial piece of all. This is about the policies and procedures of the authorized stakeholders who handle the data. This includes screening of such individuals/entities, tools and services used to process the data, the ways data will be processed, what are the data protection facilities of used tools and services etc. This a mix of both technical and processes.
Advertisements
Summary
Plotting the effectiveness of tracing and the privacy, we will end like below.
contact tracing app effectivness vs privacy
Since the tracing is about finding a specific id and its trails, data analytical component does not require meaningful data, it can work on the anonymized data (as described in the slides) and later be mapped to the real data. Or the entire data set can be processed encrypted using homomorphic encryption.
This allows some freedom in the data residency as well. Anonymized data can be kept in public cloud platform leveraging cheap and scalable infrastructure for real time lambda architecture-based analytics and later brought down to be mapped with the meaningful data.
However, Bluetooth tracing remains obstructive in iPhone.
Recently Azure announced this service called ‘Azure Lighthouse’. It allows managed service providers and customers to manage the tenant access and the delegation from a single point of interface in the Azure Portal itself. With some marketing garnish, I would like to call it as Cloud Native Managed Service Model. Let me take you through the fundamentals of Azure Lighthouse.
Before proceeding further, this post assumes, you’re familiar with AAD concepts like tenants/directories, object ids, service principles, RBAC etc. I have not referenced or elaborated them here.
Before diving in, let’s look at how the existing managed service providers access their customer tenants. Generally, they use either one of the following.
Service Provider access Customer Tenant as a Guest.
Service Provider access Customer Tenant with a customer tenant user account.
Consider this example, Aventude Digital with its Azure tenant looking for a partner to manage our Azure Resources. MassRover is a managed service provider; Aventude Digital reaches MassRover and requests their service. Bob is the support engineer from MassRover with his UPN (bob@massrover.onmicrosoft.com) should gain access to Aventude Digital tenant.
Scenario #1
Bob gets access to Aventude Digital tenant as a Guest user. In this case Aventude Digital administrator Linda should invite Bob to her tenant, with the required RBAC permissions. Once Bob receives the invitation, he can access Aventude Digital directory. When Bob logs in using his own UPN (bob@massrover.onmicrosoft.com), he can see two directories in Azure – MassRover directory where he is a direct member and Aventude Digital directory where he’s a guest user.
Bob can switch between them and access the resources as per the granted permissions and continue his support work. The invitation process is manual and repetitive. Below image shows, how Bob access different tenants, being the Guest user.
Scenario #2
Bob gets a user account from Aventude Digital tenant. Aventude Digital administrator creates a user account in their directory for Bob, something like bob_ext@aventudedigital.onmicrosoft.com. Bob must use this user to access Aventude Digital tenant. This becomes a mess when Bob manages many customers, because he has to switch between different tenants using different UPNs and related passwords. Bob ends up maintaining a table of UPNs and passwords for each tenant he works for.
In short, Guest access is commonly used. But still this is an AAD level delegation only. It is manual and when Bob selects different directories the authentication takes place and the experience is not smooth.
How Azure Lighthouse Improves this.
Azure Lighthouse offers service providers a single control plane to view and manage Azure across all their customers with higher automation, scale, and enhanced governance. With Azure Lighthouse, service providers can deliver managed services using comprehensive and robust management tooling built into the Azure platform. This offering can also benefit enterprise IT organizations managing resources across multiple tenants.
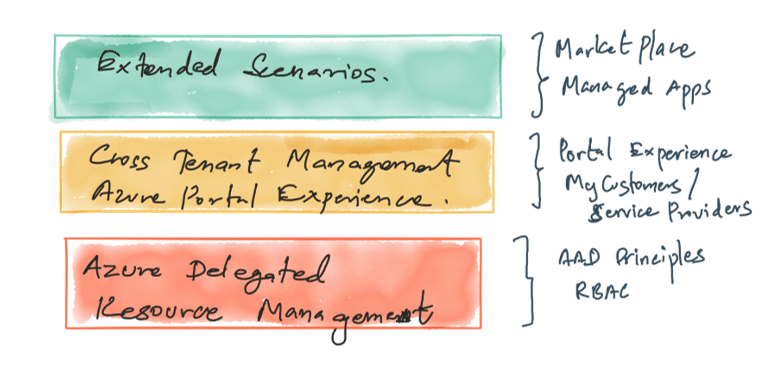
At the core of Azure Lighthouse is Azure Delegated Resource Management, on top of this Azure Portal based Cross Tenant Management Experience comes. Addition to this, we can have Extended Scenarios like Market Place & Managed Apps.
Rest of this post covers the technical implementation of Azure Delegated Resource Management and Cross Tenant Management Experience.
Delegated access can be done by two aspects, one is by manually executing the Azure Delegated Resource Management ARM scripts or by installing the published Market Place Managed Service Offering from the customer. In this post will cover the manual approach.
First, as a service provider, we should create the required ARM template to obtain the Azure Delegated Resource Management permissions from the customer tenant. These permissions can be obtained at subscription level or at the resource group level. Service Provider prepares the required ARM template, and this should be executed at the customer subscription
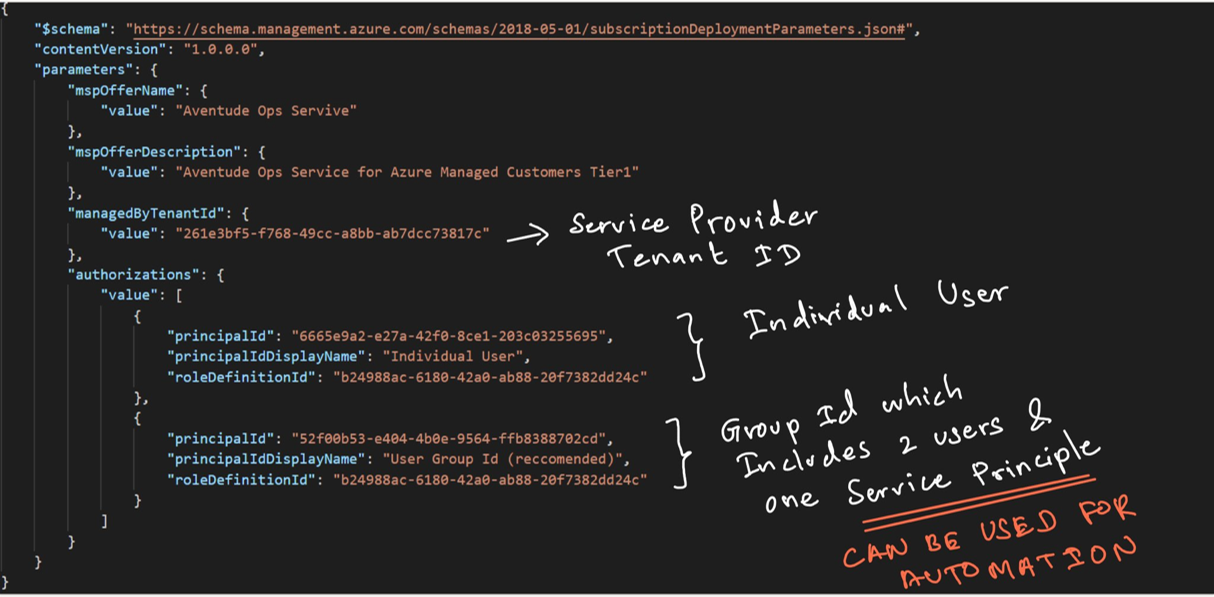
Below is the ARM template and the associated parameter file.
This file contains hidden or bidirectional Unicode text that may be interpreted or compiled differently than what appears below. To review, open the file in an editor that reveals hidden Unicode characters.
Learn more about bidirectional Unicode characters
"description": "Specify the name of the offer from the Managed Service Provider"
}
},
"mspOfferDescription": {
"type": "string",
"metadata": {
"description": "Name of the Managed Service Provider offering"
}
},
"managedByTenantId": {
"type": "string",
"metadata": {
"description": "Specify the tenant id of the Managed Service Provider"
}
},
"authorizations": {
"type": "array",
"metadata": {
"description": "Specify an array of objects, containing tuples of Azure Active Directory principalId, a Azure roleDefinitionId, and an optional principalIdDisplayName. The roleDefinition specified is granted to the principalId in the provider's Active Directory and the principalIdDisplayName is visible to customers."
This file contains hidden or bidirectional Unicode text that may be interpreted or compiled differently than what appears below. To review, open the file in an editor that reveals hidden Unicode characters.
Learn more about bidirectional Unicode characters
The ARM template expects certain meta data like the managed service offering name, description and mainly the required delegated permissions (as authorizations). These authorizations are AAD principles (users / groups / service principles) paired with the RBAC roles. The values are fed to the ARM template using the corresponding parameter file.
AAD principle Ids can be found in the relevant blades (we need to use the respective Object IDs) and RBAC role IDs can be obtained from this link
Example: Bob’s Object ID in the MassRover (service provider) tenant is – 6665e9a2-e27a-42f0-8ce1-203c03255695 and we’re requesting a Contributor permission for this user. Azure RBAC ID for the Contributor role is – b24988ac-6180-42a0-ab88-20f7382dd24c. (obtained from the above link). This combination along with a name we provide to be displayed makes one authorization delegated access management record as below.
We can add many and different authorizations.
Once the ARM template and associated parameter file are completed, customer should execute this in their subscription. In order to execute this, a non-guest user from the customer tenant with Owner permissions to the subscription is required.
PS C:\Windows\system32> az deployment create --name AzureLightHouseDeployment1 --location southeastasia --template-file "C:\Users\Thuru\Desktop\light house blog\json\al.json" --parameters "C:\Users\Thuru\Desktop\light house blog\json\alparam.json" –verbose
It takes, some time and the CLI will spit out an output json.
I used two tenants for this testing. One is called MassRover (service provider) and the other one is Aventude Digital (customer). Above script is executed at the Aventude Digital subscription and script was prepared with the parameters from MassRover. (Bob is in the MassRover tenant).
After execution. In the MassRover tenant Lighthouse, under the My Customers section we can see Aventude Digital.
In the Aventude Digital tenant Lighthouse, under the Service Providers section we can see MassRover.
This explains the basic of Azure Lighthouse, but it has some limitations at this point. One of the key limitations is, if DataBricks is provisioned in a tenant, then Azure Delegated Resource Management fails, and there are some other limitations too.
If you’re a service provider Azure Lighthouse provides a greater visibility by being in the marketplace. This requires additional setup via partner portal. Also, using service principle delegation, service providers can programmatically automate management tasks. Customers can view the Service Providers at one place including the granted access permissions.
In this post I have covered only one path of Azure Lighthouse, (subscription level delegated resource management), Let me know your experience with Azure Lighthouse and any interesting combinations.
Dependency validation helps to keep the code architecture clean and rules enforced. The video below gives a quick introduction to the dependency validation in Visual Studio.
Recently a friend, asked about enforcing constraints in a project architecture, I explained this to him. But I haven’t used it any of my previous projects (we’re good developers who do not spoil the code :P) , so thought of giving it a try. As shown in the video things should be straight forward but I ended up my validations never kicked in.
With some investigation, I found that when we add the DV project to the solution it adds the following package to all the projects.
Microsoft.DependencyValidation.Analyzers
If your project is made out from a .net core / asp.net core project template then it fails to install the above NuGet package and obviously the validation does not work.
How to fix this ?
I created a ASP.NET Core project based on .NET Framework (same applies to .NET Core as well). Added some class libraries and draw a following dependency validation layered diagram.
Red one is the web project (asp.net core) and others are simple class libraries. The structure is not complex. Just to check the validation, I referenced the DataContext in the web project as below.
This file contains hidden or bidirectional Unicode text that may be interpreted or compiled differently than what appears below. To review, open the file in an editor that reveals hidden Unicode characters. Learn more about bidirectional Unicode characters
Install the following NuGet in the ASP.NET Core / .NET Core template based projects in the solution. Other projects have it installed automatically when we add the DV project.
Open the ASP.NET Core template project file. Add the following. line numbers 15-18 should be manually added to include the DV diagram in the asp.net core web project.
This file contains hidden or bidirectional Unicode text that may be interpreted or compiled differently than what appears below. To review, open the file in an editor that reveals hidden Unicode characters. Learn more about bidirectional Unicode characters
After this all set with one small problem. Now, when we build the project, the validation kicks and the build will fail.
But the error response from Visual Studio is not consistence. It will always fail the build – that’s 100% expected behavior and it is right. But sometimes the error only appears in the Output window and not in the Error List. Also, sometimes the red squiggly does not appear.
This happens because the ASP.NET Core / .NET Core project templates do not support the DV, we did a workaround to make it work and it has some links broken to display the error message in the Error List, I hope soon Microsoft will add support to the DV in ASP.NET Core and .NET Core based project templates.
You can check / reproduce this, using the following two branches. The ‘normal’ branch has problem and the ‘solved’ branch is patch applied.
Cloud has the proven promise of great opportunities and agility for ISVs. Modern cloud platforms have low entry barriers and huge array of service offerings beyond traditional enterprise application requirements. Cloud services provide intact environment to SaaS applications with features such as cutting edge innovative services, intelligence as services, continuous integration and continuous delivery, computation and storage scale for the global reach.
The current digitized environment, device proliferation and the span of intelligent cloud services give the best mix of social, technical and business aspects for SaaS products to emerge and prevail with high success.
Cloud enables equal opportunity to every SaaS player – technical and business domain skills and expertise are vital elements in order to succeed in the SaaS playground, knowing the business and knowing the technology are two utmost important facts.
From a SaaS consumer point of view, a customer has ample number of choices available to choose from list of SaaS providers. Having the right mix of features, availability, security and business model is important. Choosing the right tools at the right time at the right cost is the skill to master.
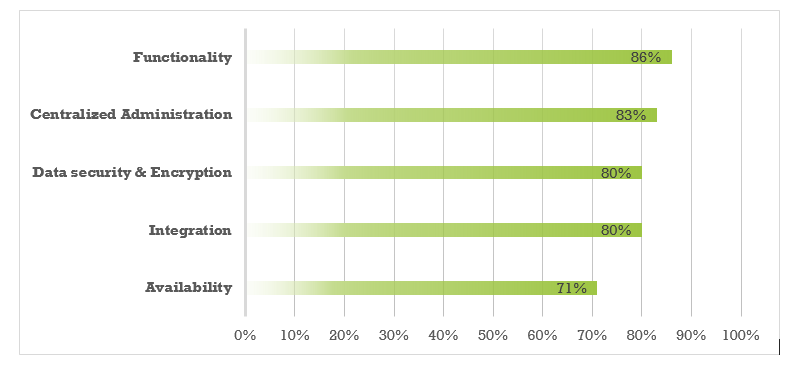
Figure 1: What customers expect from SaaS providers.
Source: Frost & Sullivan, 2017
In order to deliver successful SaaS application, ISVs should have attributes such as – concrete DevOpspractices to deliver features and fixes seamlessly, responsible SaaS adoption models concerning Administration&Shadow IT, trust and the privacy of Data & Encryption, promising service Uptime and many more.
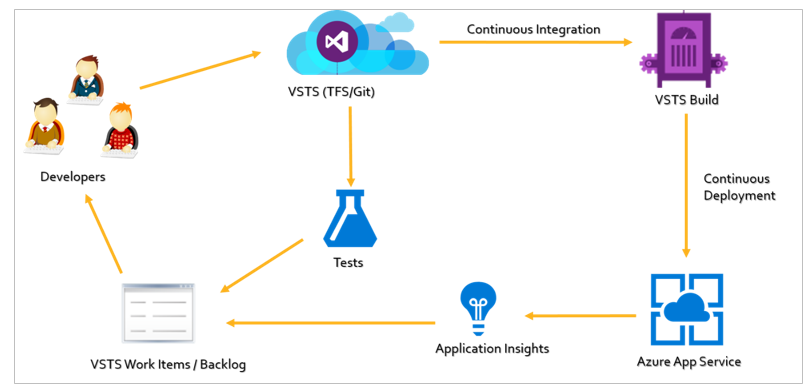
DevOps with Azure Tooling
Azure tools bring agile development practices and continuous integration & continuous delivery. Code changes take immediate effect in the build pipeline with VSTS build definitions and deployed to the respective environments in Azure.
Figure 2: The simple DevOps model with Azure tooling
Environment and resource provisioning is handled via automated ARM template deployments from VSTS build and release pipeline. The model depicted in Figure 2 vary based on the context and complexity of the project with multiple environments, workflows and different services.
Customers have the concern of how the SaaS enables the centralized organizational access management can be performed. On the other hand, SaaS providers require frictionless approach in the adoption of the services and enable more users much as possible.
Azure based organizational SaaS implementations often utilize Azure Active Directory (AAD) based integration and Single Sign On (SSO).
Customers trust the SaaS providers with their data. It is the most valuable asset SaaS providers take responsibility of in delivering value and helping the business of the customers. Data security and encryption is a prime concern and growing rapidly with complex and fast evolving regulatory and complaince requirements.
Azure has great compliancy support, tools and services in data protection. It offers many out of the box data encryption and protection services like TDE, DDM (Dynamic Data Masking), RLS (Row Level Security), In-built blob encryption and etc.
In certain cases, built-in security features do not provide the sufficient protection and compliance. In those sensitive environments we can leverage additional Azure services which provide high degree data security.
Figure 3: Advanced data security implementation in Azure
Azure Key Vault based encryption with SQL Database Always Encrypted, Blob encryption (envelope encryption), AAD based access control and MFA can be implemented in such cases. Also, this provides new models of Bring Your Own Key (BYOK) in encryption where customers can provide and manage their keys.
Service uptime should be considered not only during unexpected failures but also during updates.
Azure provides inbuilt geo replication for databases, storage and specific services. Application tier redundancy is implemented with the use of Traffic Manager. Configuring geo replication and redundancy introduces concerns like geographic regulatory concerns of data, synchronization issues and performance.
Azure tools like Application Insights for application monitoring & telemetry, auto scaling, geo replication, traffic manager and many others are mixed with architectural practices to deliver required uptime for the SaaS application.
Conclusion
Apart from the technologies and tools, SaaS application development on a cloud platform requires expertise on the platform of choice, in order to achieve cost effectiveness, business agility and innovation.
How SaaS application is bundled and sold is a crucial decision in technology strategies like cache priming, tenant isolation, security aspects, centralized security, multi-tenancy at different services and etc.
This article provides a high level of view about the considerations customers look from SaaS providers and how Azure tools and services can help in achieving them.
ASP.NET Core comes with an inbuilt Dependency Injection (DI) module. We can register custom DI modules as well. This post explains the fundamentals of the inbuilt DI module available in the ASP.NET Core.
ASP.NET Core provides 3 generic service registration types for custom services.
Singleton – One instance of the dependency to serve across all the requests.
Transient – Different instances for each dependent call, thus creating different instances of the injected service in a single request call flow.
Scoped – Single instance of the dependency in a single call flow. Within the single request call one same instance will be used.
Apart from the above 3 generic service registrations ASP.NET Core provides other inbuilt service registration methods. Let’ see how the these three generic service registration types work and how the lifecycle of the instances are handled.
Let’s have one common interface IMyService and create 3 different types of interfaces from the common type interface, each for the different service type registrations.
public interface IMyService
{
Guid Id { get; set; }
}

public interface IMySingeltonService : IMyService
{
}

public interface IMyTransientService : IMyService
{
}

public interface IMyScopedService : IMyService
{
}
Then let’s implement the above interfaces with three different classes. All these classes will create a new Guid in the constructor.
public class MySingletonService : IMySingeltonService
{
public Guid Id { get; set; }

public MySingletonService()
{
Id = Guid.NewGuid();
}
}

public class MyTransientService : IMyTransientService
{
public Guid Id { get; set; }

public MyTransientService()
{
Id = Guid.NewGuid();
}
}

public class MyScopedService : IMyScopedService
{
public Guid Id { get; set; }

public MyScopedService()
{
Id = Guid.NewGuid();
}
}
In the constructors of the implemenations we generate a Guid and we’ll print this in the View to see how many times the service instances are being instantiated. In ordert to do that let’s register the services with the right generic service registration type method respective to their implmentation name. (the generics syntax < > is not getting formatted with the wordpress code tag so I pasted the image for the below snippet. )
We can inject the services into the HomeController with the following constructir and will print the Id of each service in the View.
When we run the application we will get the below results. 2 different requests are compared.
You can note, the Singleton implementation is same across different requests. Only one instance of service which is registered as Singleton available across the requests.
The above implementation does not give a full picture to compare the difference between Transient and Scoped service registrations as they both have difference instances in different requests. In order to understand the behavior of them we need to implement another service.
Now we can register the IMyAnother service in different modes and check the instance ouptuts. The below figure explains the instance lifetime. For the same instance the similar color is maintained.
In a simpler form we summarize this like below. How many times a construcotr is being called.
Singleton – Once in the application lifetime.
Transient – Everytime the instance is requested regardless of the request.
Scoped – Once per request regardless of how many services use it.
When IMyAnohterService is added as a Scoped service the below image shows two different requests.
Singleton service remains same across all the requests.
Transient service changes between HomeController and IMyAnotherService within the same request.
Scoped service does not change in the same request as it’s the same instance for both the HomeController and IMyAnotherService but between requests it changes.
Interesting Scenrio IHttpContextAccessor
In ASP.NET Core DI model the framework also provides some additional injection methods for some known scenarios. Like registering EF DbContext using the AddDbContext method. This method by default injects the DbContext in the Scoped mode.
But the interesting scenario is registering IHttpContextAccessor as Singleton as shown below.
This service is used to access the HttpContext of the request, so registering this service as Singleton based on the official documentation collides with the experiement we did above, because having the Singleton registration would not give the flexibility to get the HttpContext per request.
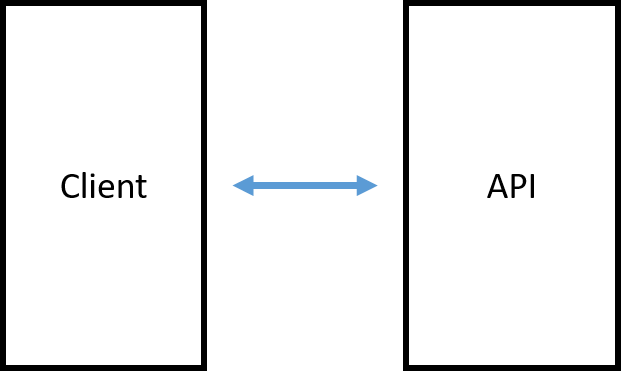
A RESTful service is a common element in any modern system. But not all the RESTful service implementations are valid Web APIs. This first post of the API architecture series, covers the idea of separation of an API from the web application based RESTful implementations.
Often we see a figure analogous to the one below in many diagrams. Regardless of what the diagram is called, if we look at this figure the direct meaning it gives, is the separation of the API and the clients.
In web development, a Javascript client talks to the RESTful endpoints designed specifically for it. There’s nothing wrong in this implementation, it is perfectly fine, but the concern is – the system does not have an API. Having mere technical implementation of a RESTful service does not create an API.
In order claim an API based architecture, the RESTful service implementation should have the following characteristics.
#1 Individually deployable
API assemblies should be deployable in a separate instance without the consuming client. Often Javascript clients are deployed together with the RESTful service, because these clients are often developed along with the API. Separate deployment model gives the benefit of scaling the API when required.
#2 Stateless or centralized state management
APIs should be either stateless and get the state information from the client request or should contain a centralized state persistence. Centralized state cache is often an in-memory caching implementation like Redi.
#3 Avoid Client Commanded Implementations
I strongly advocate this point, developers sometimes tend to do this if they find performing the required view model construction in the client is not preferable. It is hard to draw the boundary, because some aggregate operations are better be performed in the server but some cases are pure violations, Example – assume an endpoint has response body like the below JSON payload.
And having another endpoint just for the purpose of another view which has a response output like the following JSON payload is a violation.
{

id : 1,

fullName : "Thurupathan Vijayakumar"

}
The above example is a very simple one, but I have seen worst implementations that API has responses of color codes and CSS classes, where the reason was purely that developers did not want to write code in Javascript. I would call such cases as client commanded implementations.
(Back end for front end) BFF model implementations have different response messages based on the client, but that is different from view model construction. Also the features like sorting and pagination are not part of the view model construction.
#4 No cookies
A RESTful service which is exposed as an API should NOT accept any information in the cookies. This again happens with the tight coupling of web application with the RESTful service. Developers create a cookie and the consequent request from the Javascript clients to the RESTful service sends the information from the cookies. All data from client to the API should be in query string, request body or in HTTP headers.
#5 Documentation
This is not a must, but a near must for any API implementation. There are many documentation libraries available like Swagger, TRex and other API Management Gateways also provide good API documentation services.
#6 Authentication
Most public developer APIs are secured by the API keys. Ex – Google Maps. The key is often used not only in authentication but also in monitoring the request rates and etc. If the API is private (either to a single organization or few accepted parties) the recommended practice is to have an authentication. Mostly this is an OAuth 2 based authentication and there are several token formats whilst JWT being the well-known one.
With those concerns we can have a API implemented for the systems. There are many readings in based on the different aspects of the API, like documentation, hyper media, versioning, authentication, caching, scopes and etc. You can find ample amount of resources in the web sphere. This post gives the fundamental idea – separation of API and web application implementation. In the next post we will discuss more about implementing an API using the ASP.NET Core and EF Core stack.


 Source: Frost & Sullivan, 2017