
Please read this post after reading this, as some critical changes have gone to the DDM feature of SQL Databases in GA
SQL Database Dynamic Data Masking will be Generally Available (GA) very soon by the end of this month.
For more information about Dynamic Database Masking please read this article.
As per the article you can configure the dynamic data masking on columns which have sensitive data, and also we have the options to specify the SQL Logins which should be excluded from masking. Meaning any user connecting to the database using the specified SQL login will see the data without being masked.
- SQL Logins will be removed from the exclusion list and you have to specify the SQL users or Azure AD users directly in the exclusion list.
- SQL users with administrative privileges are always excluded from dynamic data masking
Example:
In a SQL Database server with a SQL Database named Db1 there are 3 SQL logins.
|
SQL Login |
SQL user |
Privilege |
| thuru | Thuru | Admin (sa) for the server |
| login1 | User1 | db_owner for Db1 |
| login2 | User2 | db_owner for Db1 |
First thing to note is, after the GA of the feature you cannot user SQL login names in the exclusion list in the portal meaning that you cannot specify login1, login2 in the list. Instead of specifying the SQL login you should specify the SQL users as user1, user2.
And SQL users who have administrative privileges always see the data.
Look at the image below as I have specified only user1 in the exclusion list.

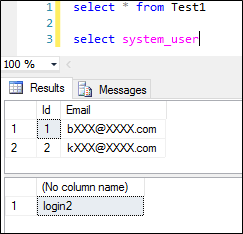
Login to the database as thuru and executing a SELECT statement results this.

As you see, though I haven’t specified the admin user in the exclusion list, still admins are automatically excluded from dynamic data masking. If you’re using admin users in your application and enabled dynamic data masking, you have to create other SQL logins to access the database.
Login to the database as user1 and user2 outputs the following results respectively.

How to create other SQL Logins in SQL Database
Login to the server using the admin user.
-
Select the master database and create the logins using this command.

-
Connect to the database you want to add the user to and add the user using the created SQL login in step 1

-
Add roles to the user

