Enterprise data life cycle management using Azure Storage

Storage is one critical component in the Enterprise world. Managing data and its life cycle is a crucial element in many aspects, such as optimizing storage usage, managing cost, adhering to the compliance & archival requirements, security and etc.

Primarily data is stored in database systems (relational and non-relational sources) and as files (includes data lake and blobs), addition to that, data resides in other systems like email servers, document systems, file shares, event and messaging pipes, logs, caching systems and etc.

Laying out a comprehensive data strategy for an organization is a complex process. However, in most cases the data lands in a flat storage as the final tail grade destination. So managing the storage and life cycle management is an important task.

Let’s consider a simple backup storage scenario.

A relational data source assume a SQL Server VM, has following backup requirement.

Frequency Backup Type # backups Access Frequency
4 hours Incremental 42 Medium
Daily Full 30 High
Weekly Full 12 High
Monthly Full 12 Low
Semi-Annual Full 6 Very Low
Year Full 8 Very Low

At any given time (assuming a complete 8 years span) there should be 110 backups maintained. Those 110 backups, should be kept in the right storage based on the access frequency and retention period.

Azure Storage provides access tiers which helps us to determine and auto manage the storage requirements.  Azure storage (storage generation v2) let us define life cycle policies at blob level.

The below diagram depicts this

storage tiers

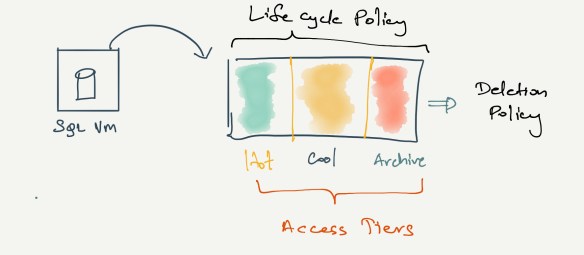
As shown in illustration, there are three access tiers, hot, cool and archive. Hot and Cool access tiers can be set at the storage account level, and archive tier is set at the individual blob level.

We can define life cycle policies, where the blob movement between tiers from hot to archive and all the way to deletion can be automated to match our requirements.

Sample life cycle policy of a blob.


{
"rules": [
"enabled": true,
"name": "yearly backup rule",
"type": "Lifecycle",
"definition": {
"actions": {
"baseBlob": {
"tierToCool": {
"daysAfterModificationGreaterThan": 30
},
"tierToArchive": {
"daysAfterModificationGreaterThan": 60
},
"delete": {
"daysAfterModificationGreaterThan": 370
}
}
},
"filters": {
"blobTypes": [
"blockBlob"
],
"prefixMatch": [
"backups/annual"
]
}
}
}
]
}

You can see, under the filters section, we can specify the path, where the rule should be applied. In this way we can have more than one rule for a storage account addressing different paths.

Out of different options in the Azure storage, we should have a standard general purpose V2 storage, in order to get the access tier capability. Standard blob also has the access tier capability. Standard storage is powered by magnetic disks.

Whereas, Premium storage is powered by SSDs but does not offer access tier. Premium storage is intended for the page blobs, like virtual machine disks. Addition to the page blobs, we can use premium storage as blob storage and file shares.

At summary this is the high level view of the available options in Azure Storage.

stroage summary view


Uploading a file to Azure Blob

Windows Azure storage provides flexible storage services. Blob storage is one of them which is used to store binary large objects. 

Windows Azure blob has the concepts of containers (which you can think like partitions of a disk). Containers are either private or public.

Private containers are only accessible to the user and application developer with proper storage access keys. Public containers are accessible to all. So just by URL you can access a file stored in the public container.

You can use the Azure Storage Explorer to create and manipulate your Azure storage. It is a handy tool available for free from codeplex. Download link : http://azurestorageexplorer.codeplex.com/

The below code sample demonstrates how you can upload a file to a private container named ‘privatecontainer’ in Windows Azure.

   1: private void UploadFileToPrivateContainer()

   2: {

   3:     // get the storage (blob) connection string from the config file

   4:     var storageAccount = Microsoft.WindowsAzure.Storage.CloudStorageAccount.Parse

   5:         (CloudConfigurationManager.GetSetting("StorageConnectionString"));

   6:  

   7:     // creates a blob client

   8:     CloudBlobClient blobClient = storageAccount.CreateCloudBlobClient();

   9:  

  10:     // creates a container :: container name should be small otherwise you'll get Error 400 Bad Request Error.

  11:     CloudBlobContainer container = blobClient.GetContainerReference("privatecontainer");

  12:     container.CreateIfNotExists();

  13:  

  14:     // gets the physicall file path to be uploaded from ASP.NET FileUpload content.

  15:     string path = FileUpload1.FileName;

  16:     

  17:     // creating a blockBlob, if a block blob exists witht the same name then it will be replaced.

  18:     CloudBlockBlob blockBlob = container.GetBlockBlobReference(Path.GetFileName(path));

  19:  

  20:     var stream = FileUpload1.FileContent;

  21:  

  22:     // uploads the stream.

  23:     blockBlob.UploadFromStream(stream);

  24:  

  25:     stream.Close();

  26:  

  27:     Label1.Text = "Upload Success";

  28: }

I used the Azure Storage Explorer to create the container, you can create it using the code as well.

In order to run the above sample you should have Azure SDK installed and use Nuget Package manager to install the Windows Azure Storage assemblies.

Here’s the code for transfer a file from a private container to public container. Azure storage SDK doesn’t have an operation for move. So here we copy the file to the public container by downloading and re uploading it and deleting the file from the private container.

   1: protected void BtnMove_Click(object sender, EventArgs e)

   2: {

   3:     var storageAccount = Microsoft.WindowsAzure.Storage.CloudStorageAccount.Parse(CloudConfigurationManager.GetSetting("StorageConnectionString"));

   4:     CloudBlobClient blobClient = storageAccount.CreateCloudBlobClient();

   5:  

   6:     CloudBlobContainer privateContainer = blobClient.GetContainerReference("privatecontainer");

   7:  

   8:     CloudBlobContainer publicContainer = blobClient.GetContainerReference("testpubliccontainer");

   9:  

  10:     /*

  11:      * Moving is not available directly, so we download from priavte blob and upload to public blob.

  12:      * and delete the file from private file from private blob

  13:      */ 

  14:  

  15:     // getting the blob to move.

  16:     // based on my UI user has t type the name of the file he/she wants to move.

  17:     var prblob = privateContainer.ListBlobs(null, false).OfType<CloudBlockBlob>().FirstOrDefault(b => b.Name == TextBox1.Text);

  18:  

  19:     var stream = prblob.OpenRead();

  20:  

  21:     var blobref = publicContainer.GetBlockBlobReference(prblob.Name);

  22:     blobref.UploadFromStream(stream);

  23:  

  24:     stream.Close();

  25:  

  26:     prblob.DeleteIfExists();           

  27: }

Finally the below code samples how to query the files in a blob.

   1: protected void BtnGetVideos_Click(object sender, EventArgs e)

   2: {

   3:     var storageAccount = Microsoft.WindowsAzure.Storage.CloudStorageAccount.Parse(CloudConfigurationManager.GetSetting("StorageConnectionString"));

   4:  

   5:     // creates a blob client

   6:     CloudBlobClient blobClient = storageAccount.CreateCloudBlobClient();

   7:  

   8:    

   9:     CloudBlobContainer publiccontainer = blobClient.GetContainerReference("testpubliccontainer");

  10:     List<BlobDetails> list2 = new List<BlobDetails>();

  11:  

  12:     foreach (IListBlobItem item in publiccontainer.ListBlobs(null, false))

  13:     {

  14:         if (item.GetType() == typeof(CloudBlockBlob))

  15:         {

  16:             CloudBlockBlob blob = (CloudBlockBlob)item;

  17:             list2.Add(new BlobDetails() { BlobName = blob.Name, URL = blob.Uri.AbsoluteUri });

  18:         }

  19:     }

  20: }