Azure Key Vault setup and usage scenarios

Introduction

At the time of this writing Azure Key Vault is in preview.  Azure Key Vault is a secure store solution for storing string based confidential information.

The reason I’ve mentioned that the string based confidential information is that you can store a key used for encrypting a file, but you cannot store the encrypted file itself as a file object; because some people have the confusion what could be stored inside the Key Vault.

Azure Key Vault – http://azure.microsoft.com/en-gb/services/key-vault/

Key Vault store 2 types of information

  1. Keys
  2. Secrets

Secrets– This could be any sequence of byte under 10 KB. Secrets can be retrieved back from the vault. Very much suitable for retrievable sensitive information like connection strings, passwords and ect. From the design point of view, we can either retrieve the keys every time we need or retrieve it once and store in the cache.

Keys – Keys could be imported to the vault from your existing vaults, also if your organization has Hardware Security Modules (HSM) you can directly transfer them to HSM based Azure Key Vault. Keys cannot be retrieved from the vault. For example if you store the key of a symmetric encryption which encrypts the files, you should send the files to vault ask the vault to encrypt / decrypt the data. Since keys cannot be retrieved from the vault this provides a higher isolation.

Keys could be stored in 2 different ways in the vault

  1. Software protected keys
  2. Hardware protected keys

Software Protected Keys – This is available in the standard tier of the vault. Compared to the Hardware protection this is theoretically less secured.

Hardware Protected Keys – HSMs are used to add premium hardware based circuitry secure storage for the keys. The most advanced key vault system available.


Provisioning Azure Key Vault

As Azure Key Vault is used to store sensitive information the authentication to the Azure Key Vault should happen via Azure AD. Let me explain it in simple steps.

  1. First a subscription administrator (either the service admin or co-admin) will create a Azure Key Vault using PowerShell.
  2. Then the admin registers an Azure AD application and generate the App Id and the App Secret Key.
  3. Admin grants the permission (trust) to the App to access the Key Vault using PowerShell.
  4. The subscription where the Vault is created should be attached to the Azure AD where the accessing app in the above step is created.
  5. This ensures that accessing app is an object of the Azure AD on which the subscription where the Vault is created is attached to.

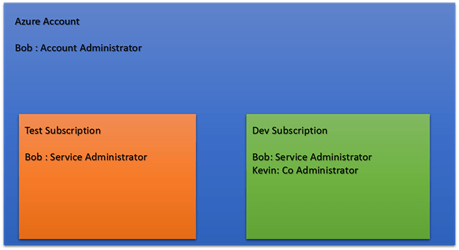
Sometimes the 4th and 5th points might be bit confusing and you might face them especially when dealing with the multiple Azure subscriptions. See the below image for a clear picture.

Picture5

Assume that you have two subscriptions in your Azure Account, if you create the Vault in the Development subscription the app which can authenticate to the Vault should be in the Default AD. If you want to have the app in the Development AD you have to change the directory of the Development subscription.

Usage

Assume MassRover is a fictional multi tenant application on Azure.

ISV owns the Azure Key Vault

Scenario 1 (using secrets to for the encryption) – MassRover allows users to upload documents and it promises high confidential data security to its tenants. So it should encrypt the data at rest. MassRover uses it’s own Azure Key Vault to store the secrets (which are the encryption keys).  A Trust has been setup between the Azure Key Vault and MassRover AD client application. MassRover Web App authenticates to the Azure Key Vault retrieves the secrets and performs the encryption / decryption of the data.

Picture1


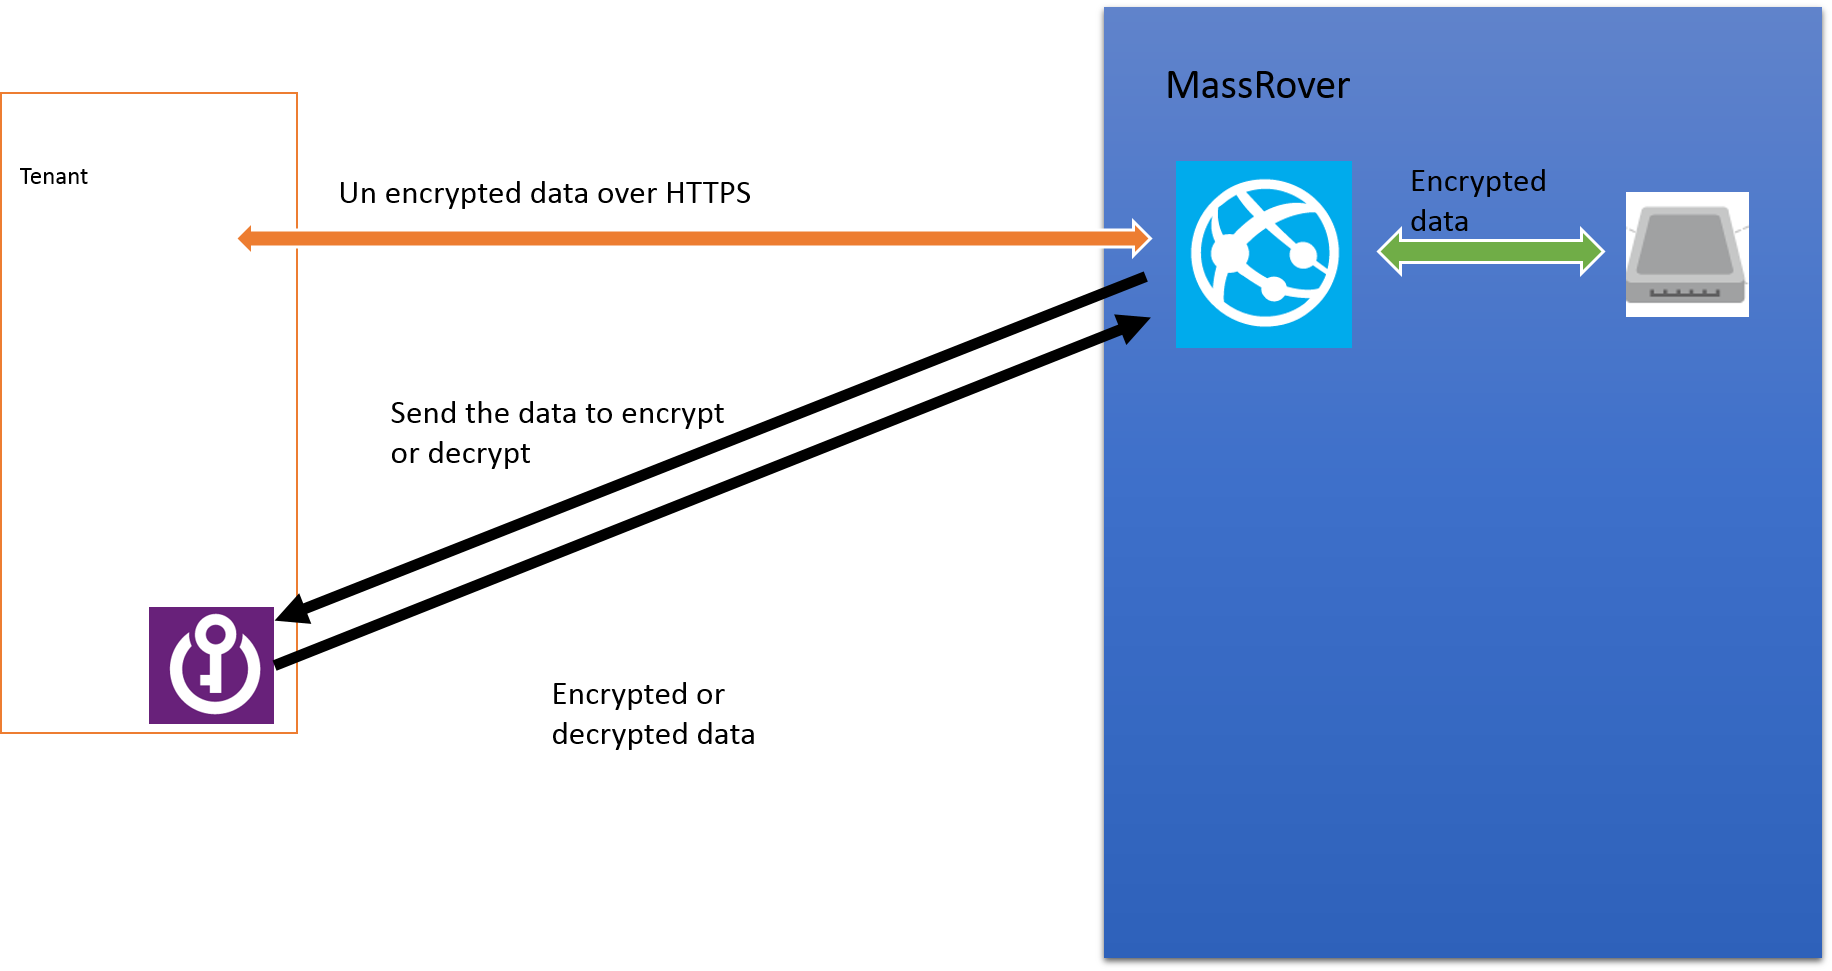
Scenario 2 (using keys) – MassRover Azure Key Vault stores the keys which cannot be retrieved out of the Vault. So the web app authenticate itself with the Vault and sends the data to the Vault to perform the encryption of decryption. This scenario has higher latency than scenario 1.

Picture2


Tenant owns the Azure Key Vault

Tenants can own their Key Vault and give access to MassRover by sharing the the authorized application Id and application secret. This is an added benefit if the tenants worry about ISVs keeping the keys in their subscription and administrative boundary. Tenant maintained Key Vaults give additional policy based security for sure but latency is high since data transfer has to happen across different wires. (this could be solved to certain extent if the tenant provisions the Key Vault in same region).

Tenant maintained Key Vault also has 2 scenarios explained above, as either to go with the secrets or go with the keys.

Scenario 3 (using secrets)

Picture3

Scenario 4 (using keys)

Picture1


Useful links

Azure Key Vault NuGet packages (at the time of this writing they in pre release stage : http://www.nuget.org/packages/Microsoft.Azure.KeyVault/

PowerShell for provisioning Azure Key Vault and .NET code sample : https://github.com/thuru/AzureKeyVaultSample

Channel 09 – http://channel9.msdn.com/Shows/Cloud+Cover/Episode-169-Azure-Key-Vault-with-Sumedh-Barde

Contribution of cloud computing to the Agile

I can be pretty sure that almost all the times we hear the word Agile our mind relates that to the Agile software development process rather than the English word agile. Even Google thinks so. True enough that the semantic of the English word agile is they key to name the so called process as agile.

image

The reason I gave such an introduction to the agile is to bring out how much popularity the process has gained overtime. There’re different ways to implement agile, I don’t know any of them properly by the rules. But I have an understanding that the core of the agile is iterative thinking in an incremental delivery mode. That’s the key rest is how you do that.

Thinking about the current software delivery, the process of agile and how it evolved from the well blamed waterfall model, I felt little happy about myself for knowing some old school stuff. I think I was lucky enough to work with computers with huge keyboards which make sound of a shutting clam with green monochrome screens. They used to run the so called DOS 6.2. I have written programs in GW Basic and FoxPro and used 5 1/2  inch floppy disks.

Software used to be developed and  delivered totally different in those days. An ISV  had to write the software and ship it through some hard media (floppy disks or optical drives) mostly with a serial key for licensing purposes. We couldn’t think of iterative delivery on that model. A huge complex software would have ended up with 100s of CDs delivered to the client every two weeks; probably requiring a delivery service like DHL or FedEx.

So the delivery and the development practices were forced to lock up in the boundary of water fall model because frequent deliveries were mostly impossible due technology limitations. And those days most of the software were written for desktop computers.

With the time, industry evolved and cloud computing has become the heart and soul of the IT. Software development practices started to change and most of the development occurs for the cloud.

Cloud not only facilitates the different licensing models and how organizations manage their resources, cloud also has changed the entire software development process. It brought the trends of continuous delivery, online build automation, continuous integration, cloud source control and much more features which are the core part for the iterative development and agile methodologies.

Without those tools and technical processes we cannot think of implementing agile in software development in the modern day. Cloud facilitates the modern Agile Software Development and Dev Ops.

Each and every line of change is reflected to the customers in near real time with entire automation. Iterative development is fueled by the fast feedback loops. In order to gain the faster feedback loops continuous delivery is vital. Cloud computing facilitates this phenomena.

image

The developer and operations work flow is seamless with the cloud computing. Platforms like Microsoft Azure provides end to end DevOps workflow with tools like Visual Studio online, Azure Web Apps and Application Insights which exactly maps to the above diagram.

Cloud not simply a platform it’s the trend setter.

Project Oxford – Behind the scenes of how-old.net

http://www.how-old.net has been trending recently in social media. Simply you can upload a picture in this website and it will detect the faces in the photo and tells you the gender and the age of the person the face belongs to.

The site uses Face API behind the scenes, which is available here http://gallery.azureml.net/MachineLearningAPI/b0b2598aa46c4f44a08af8891e415cc7

You can try this service by subscribing to the service. It’s an App Service in Microsoft Azure and you need to have a Azure subscription to subscribed to that. Currently it is free and you are allowed to make 20 transactions per minute for the subscription.

image

image

Once you are done with the purchase like any other service Face API is available in the Azure Marketplace section.

image

In the management section you can get the key for the API, the Face API is managed by Azure API Management (read more about Azure API Management here)


image

Face API teams also provides a sample WPF application with the portable client library as a wrapper for their REST service.

Getting Started with the Face API .NET client SDK

A simple face detection method would be very similar to this.

var faceClient = new FaceServiceClient("<your subscription key>");

                        var faces = await faceClient.DetectAsync(fileStream, false, true, true, false);

                        var collection = new List<MyFaceModel>();

                        foreach (var face in faces)
                        {
                            collection.Add(new MyFaceModel()
                                {
                                    FaceId = face.FaceId.ToString(),
                                    Gender = face.Attributes.Gender,
                                    Age = face.Attributes.Age
                                });
                        }

A direct JSON output would be like this. (test it here – http://www.projectoxford.ai/demo/face)

image

Face detection is made immensely easy by this research project. 🙂 Happy face detection.

The library has loads of other features like matching faces, grouping highlighting and all.

Which Azure Cache offering to choose ?

The above is one of the burning questions from Azure devs, and with all other cache offerings from Microsoft Azure along with their sub categories the confusion gets multiplied on what to choose.

Currently there are (and probably not for a much longer in the future) 3 types of cache services available in Azure.

  • Azure Redis Cache
  • Managed Cache Service
  • In-Role Cache (Role based Cache)

Ok now let me the answer the question straightly (especially if you’re lazy read the rest of the post) – For any new development Redis cache is the recommended option

https://msdn.microsoft.com/en-us/library/azure/dn766201.aspx

So what is the purpose of the other 2 cache offerings ?

I blogged about the Managed Cache Service and Role based Cache some time back. (I highly recommend to read the article here before continue the reading) . The below diagram has the summary.

Picture1


Read this blog post to get to know how to create and use Role based cache and Azure Managed Cache service.

Pricing, future existence and other details

Role Based Cache :

Since the Role based cache is technically a web/worker role regardless of whether it is co-located or dedicated, it is a cloud service by nature. So you create a cloud service in Visual Studio and deploy it in the cloud services, you can see and manage these roles under the cloud service section in the portal. And cloud service pricing is applied based on the role size. Role based cache templates are still available in Azure SDK 2.5 and you can create them, but not recommended. The future versions of the Azure SDK might not have the Visual Studio project template option for the Role based cache.


Azure Managed Cache Service :

The blog post shows how to create the Managed Cache in the Azure management portal and how to develop applications using C#.NET. But if you try to create the Managed Cache service now you will not find the option in the Azure management portal, because it’s been removed. At the time of writing of that blog it was available. The reason why it’s been removed is very obvious because Microsoft recommends Redis cache as alternative. The apps which use the Managed Cache service will continue to function properly but highly recommended to migrate to Redis Cache. Still the creation of Managed Cache option is available in Azure PowerShell. I’m not discussing about the pricing of the Azure Managed Cache service since it’s been discontinued. I have a personal feeling that Managed Cache service will soon be eliminated from Azure services, Microsoft might be waiting for that last customer to move away from Managed Cache Service 😛


Azure Redis Cache :

This is the newly available feature Redis on Windows cache option. The below link has information about the usage pricing and other information about the Azure Redis Cache.

http://azure.microsoft.com/en-us/services/cache/

Connecting to Ubuntu VM on Azure using Remote Desktop Connection

In order to connect to your Ubuntu VM from a Windows first we have to enable the XRDP in the Ubuntu in order enable the Remote Desktop Connection.

So to enable XRDP we should connect to the server, PUTTY is a the commonly used client for SSH. (SSH is enabled by default in the Ubuntu VM on Azure). Download PUTTY from here and follow the steps in this article to connect to the Ubuntu server.

Once connected with username (azureuser) and password execute the following shell command to enable XRDP on the server

sudo apt-get install xrdp

After executing the command go to Microsoft Azure management portal and Add the Remote Desktop Connection endpoint for the server. Once you’ve added this endpoint you can see the connect icon is back to live (earlier it was grayed out) click on the connect icon and download the RDP file for the Remote Desktop Connection.

Now you can connect to your Ubuntu VM from Windows.

Note still your Ubuntu environment has the shell, if you want to enable the interactive desktop execute the following commands in the connection you made.

First I executed this.

sudo apt-get install ubuntu-desktop 

But things there was message saying to run the update, so I executed the update with this command and executed the install command again, everything was fine and smooth.

sudo apt-get update 

Close the connection and connect again, (logoff and reconnect) you will be welcomed with the Ubuntu desktop experience.

image

For this demonstration I used Ubuntu Server 12.04 LTS

Microsoft Azure API Management Policies

This is the second post of the Microsoft Azure API Management tutorial. See the first post – Introduction to Microsoft Azure API Management. This post describes about the advance

Policies define the rules for the incoming and outgoing API requests. See this link for the full API Management Policy Reference. Different policies are applied at different levels of the API Management. In order to define a policy go to Policies tab, select a Product or a API or an Operation based on what the policy could be applied, then drag and drop the policy template and fill the parameters. (I think Microsoft Azure will come with a good UI for doing this in the near future).

For example I’ve explained how to create a policy to limit the number of calls to the API. I have the same API I explained in the previous post – Introduction to Microsoft Azure API Management. Go to Policies tab select the Product and in the right hand side you will the list of policies. Since you we haven’t configured any policies yet the work area will ask you to create a policy for the API. Click ‘Add Policy File’. Then click on the <inbound> section of the XML. The position of the cursor is important based on which policy you want to add; in this sample we’re adding a call limiting policy then its obvious we should add in in the inbound section of the XML if you keep the cursor in other areas and try to add the call limiting policy the interface will react numb. Unfortunately if won’t tell you what’s wrong but simply you cannot add the policies. API Management Policy Reference will guide you get the knowledge about the usage of the policies.

Call Rate Limiting Policy

Capture

Once the policy is added you can see the policy template and it’s a matter of filling the blanks. Notice that this policy is applied in the Product level in the configuration, but it provides the granularity to control the calls to Operations level in the XML. I have added few inputs and the final policy looks like the following.

defined policy

The XML template is self descriptive. Here I have mentioned that only 10 calls could be made in 60 seconds from one subscriber (from one subscription key). And in that 10 calls Nebula Customers API  would handle 6 and again even those 6 calls are equally divided to 2 Operations. After editing the template we save the configuration. Then let’s check that in the Developer Portal.

too many requests

See the response when I try to make the 4th call to the operation it says me to wait for some time. I personally prefer this error message because it’s very helpful and developers can easily hook up any automatic retry call with an accurate timer event rather than randomly polling the service.

Content Serialization

Now let’s check another policy; notice that the API Management outputs the content in JSON as it is the default content format of our backend service. Suppose if I need the format in the XML  I can use the ‘Convert JSON to XML’ policy. Make additional note here that this policy could be applied at API or Operations scopes. So we should select the API and create a new policy configuration.

image 

Since I have applied this policy at the API level all the Operations in the API will return XML. Let’s check that by invoking the same Operation we invoked in the previous scenario and we get the response in XML as expected.

image

There are plenty of Policies available as templates including CORS access, IP restriction and others. Try different policies to get know them better in the implementation. I think soon Microsoft Azure team will come up with a new user interface for the Policy management.

Introduction to Microsoft Azure API Management – Step by Step tutorial

Introduction to API Management

Microsoft acquired a company named Apiphany last year (read about the acquisition) and jumped to the API Management market. So what is API Management ? Given below is the definition what Google gives for the question; indeed it’s a fairly well descriptive definition.

imageMicrosoft Azure API Management is backed by the compute and the storage of Microsoft Azure. Rest of the post explains how to get started with the API Management.


Getting Started with Microsoft Azure API Management

Login to the Microsoft Azure portal, go to API Management and create a API Management service. In the first screen of the wizard you have to specify the URL, select the subscription (if you have more than one) and the region.

image

In the next screen you enter your organization name and the administration email. (you can simply enter your personal email here it doesn’t need to be the one with your organization domain specific one. I used my hotmail id).

image

In this screen you can select for the advance settings, which opens the third wizard panel. There you can select the tier. There are two tiers available; Developer and Standard. Default selection is Developer tier.

See the difference between the tiers : http://azure.microsoft.com/en-us/pricing/details/api-management/

Now the API Management service has been provisioned.

image 

Creating APIs

Click on the arrow icon and get inside the service, then click on the Management Console. By default when you create a Azure API Management service it creates a sample API known as Echo API and sample Product. I deleted all the auto generated default APIs and Products and this article walk you through from the scratch.

API Management requires a back end service, which is our real web service we want to expose via API Management to developers. I created a simple REST service using Web API and hosted it in the Azure Websites. The URL http: //nebulacustomers.azurewebsites.net/ 

With those information we can now start using Azure API Management. First we have to create a API. In the management console click on APIs and create one.

image

Enter the name of the API and the web service URL. Web API URL suffix is a URL suffix which is to group and categorize the service endpoint as you create many APIs. It is optional but good to have because that will make your life easier as your number of APIs grows. By default HTTPS is selected.


Adding Operations

Technically speaking operations are trigger points of the web service in the API Management. Click on the API we created (Nebula Customers) and select the Operations tab and click on ADD Operation.

image

Here we can create operations and point them to our backend web service. Many operations can point to a single endpoint in our backend service. In my backend service I have only two endpoints.

http: //nebulacustomers.azurewebsites.net/api/customers – List of customers

http: //nebulacustomers.azurewebsites.net/api/customers?name=<name> – Gets the specified customer object.

We create 3 operations, two of them will point to the first endpoint and the last one will point to the endpoint with the name parameter.

Create three operations as follows.

Operation to list the customers

  • HTTP Verb – GET
  • URL Template – /customers
  • Rewrite URL Template – /api/customers
  • Display Name – List of customers

Operation for the cached customers

  • HTTP Verb – GET
  • URL Template – /cachedcustomers
  • Rewrite URL Template – /api/customers
  • Display Name – List of customers
  • And go to Cache tab and check the Enable.

Note that above 2 operations are pointing to the same endpoint in our backend service as the rewrite the URL templates are same. Here caching is done by the API Management and our backend service isn’t aware of it.

Third operation to get the customer with the specified name.

  • HTTP Verb – GET
  • URL Template – /customers/{name}
  • Rewrite URL Template – /api/customers?name={name}
  • Display Name – Get the customer by name

After adding all three operations you will have a similar screen like this.image

Creating Products

Now we have our API and operations, in order to expose the API to developers as packed module we should create a Product and associate the API to it. One Product can have many APIs. Developers who subscribe to a Product get access to the APIs associated with the Product.

Go to Product tab and create new Product.

image In this screen check the “Require subscription approval” if you need to get email requests for approving the subscription requests. You have to configure this email address in the notification section. Second checkbox “Allow multiple simultaneous subscriptions” allows the developers to create more than one subscription for the product. Each subscription is identified by a unique key and in this option you also can specify the maximum number of simultaneous subscriptions.

After creating the Product click to open that and associate the APIs to the Product. Click in ADD API to Product.

image

Go to Visibility tab in the product section and check Developers. Developers need to authenticated themselves in the Developer Portal, subscribe to Products and obtain subscription keys in order to use the API. Guests are unauthenticated users who allowed to view the APIs and operations but not to call them. Administrators are the people who create and manage APIs, Operations and Products.

After enabling the visibility to developers Publish the product in order to make it available in the Developer Portal.


Developer Portal

Now the API is built and published, now it’s the developers work to deal with the Developer Portal and subscribe to the product. Click on the Developer Portal link in on the right hand top corner. When you’re working as the administrator and click on the Developer portal you are logged into the Developer portal as administrator.

image

The above is the default view of the Developer Portal. You can do branding on the portal if required.

Go to Products and you can see the Product we created and as an administrator you’re already subscribed to this Product. So click on the APIS tab click on the specific API.

image

Click in the List of Customers operation and click on the Open Console in order to check test the service.

image 

Click on th HTTP GET and invoke the service. The above URL is the full URL with the subscription key. Response comes in JSON (as this is the default of my backend service).

image 

Now invoke the List of cached customers and check the response time.

First call it took 402ms.

image

Second call took only 15ms.

image


Similarly invoke the Get customer by name specifying a parameter. The coolest part of the Developer Portal is that it’s really helpful for the developers to test the endpoints and also it generates the code in may languages on how to consume those endpoints. Below is the code generated in Objective C for consuming the customer name endpoint.

image


Conclusion for the Introduction

Now our API Management service is working perfectly. We can control the input and output of the service in more granular ways using policies. We can configure notifications, customize email templates, security, assigning different identity management of developers and much more. These things I will cover in the API Management Advanced tutorial on another blog post.

If you want to try the exact demo I’ve explained here you need the exact backend service. You can download it here. (requires Visual Studio 2013)