Shadow IT – Tradeoff between frictionless user experience and being responsible with AAD V2

Introduction

First let me begin with ‘What is meant by Shadow IT ?’. In a broader view shadow IT is, any sort of IT usage without the direct governance of IT department of your organization.

Sometimes this remains as a violation of the company policies, but the proliferation of the cloud SaaS applications and BYOD trends makes shadow IT an unavoidable practice.

100-cloudtweaks-comic

A simple example would be a cloud based file sharing application used in an organization which is not officially approved by the IT.

In most cases organizations are not aware of the tools used by their employees and shadow IT usage. Only 8% of the organizations are aware of their shadow IT usage.

percentage shaow it

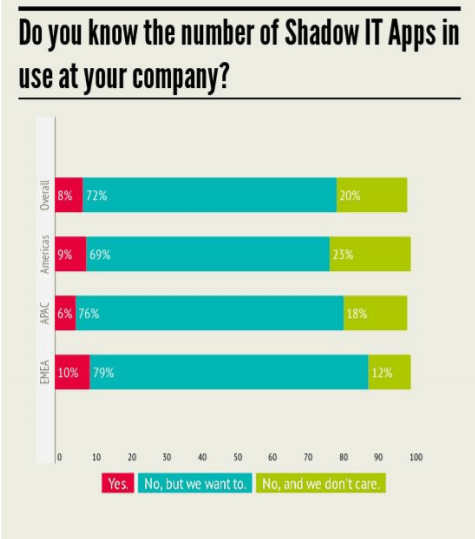
Taken from – Cloud Adoption Practices & Priorities report 2015 : Cloud Security Alliance.

In my opinion there are two major reasons which fuel the increasing shadow IT practices. First, when employees have higher and diversified devices than the ones available at work. Secondly when they find sophisticated SaaS tools than the ones available at work.

Another notable reason is – communication between contextual boundaries, like departments, SBUs and other companies – people tend to use cloud based SaaS tools either for convenience or due to some already existing shadow IT practices of a party.

How to with AAD V2

So, what is the importance in software development in shadow IT ? –  One of the projects I’m involved with has been going through the transformation of being an internal system to a public system. We decided to open this up as a SaaS tool that anyone with a Azure Active Directory (AAD) credential can use it.

Behind the scenes the application has rules to track the user, tenant, recurrence of the tenant, other users in the tenant and the list grows. But anyone with a valid AAD account can simply create an account and start using it. This makes the application a perfectly fitted candidate in Shadow IT. It’s a perfect Shadow IT tool.

As SaaS provider we want many users as possible using our system, after all we charge per transaction 🙂

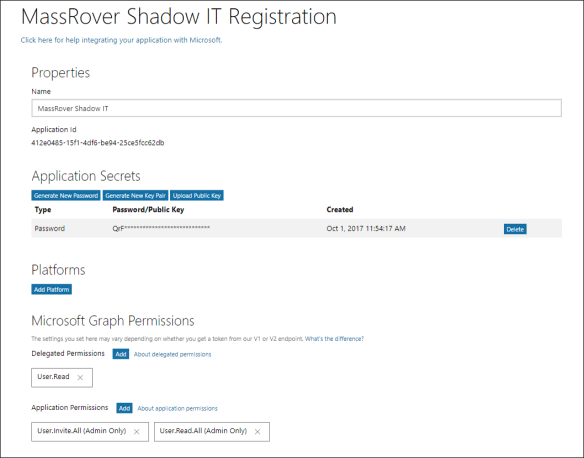
  • The application is registered as a AAD V2 app in the home directory.
  • We removed the friction in the enrollment by keeping only the minimal delegated permission (User.Read) in the app.

But in order to provide more sophisticated experience inside the application we require access to AAD and read permissions on other users. In order obtain this we thought of an approved shadow IT practice via application permissions.

  • We added the admin privileges to the application permissions, and generated application secrets.

The configured AAD V2 app principle look similar to the below one.

b1.PNG

In the experience point of view, we trigger the typical following normal AAD login URL for the user login. We trigger the organization endpoint (restrict the Microsoft accounts) with the following URL. (You can try the URL)

https://login.microsoftonline.com/organizations/oauth2/v2.0/authorize?client_id=412e0485-15f1-4df6-be94-25ce5fcc62db&response_type=id_token&redirect_uri=https://localhost:8080&scope=user.read openid profile&nonce=3c9d2ab9-2d3b-4

This will popup the login and after the successful validation of the credentials you’ll see the following consent screen.

b3

User accepts the consent and she’s inside the SaaS application Shadow IT begins here. In order to get the additional rights we allow the user to inform her IT administrator and ask for additional permission.

IT administrator will be notified by the email entered by the user with following admin consent link.

http s://login.microsoftonline.com/[tenantid]/adminconsent?client_id=412e0485-15f1-4df6-be94-25ce5fcc62db&response_type=id_toke&redirect_uri=https://localhost:8080

Here we obtain the tenant id from the id_token from the user logged in previous step. When the IT administrator who has admin rights in the AAD hits the above URL and after successful validation of the credentials he will see the following admin consent screen.

b4.png

The permission list varies based on the configured application permissions in the application. After successful consent grant, the redirection will happen to a URL similar like this

http s://localhost:8080/?admin_consent=True&tenant=[tenant id]

Now the application can use the app secret to access the specific tenant.

NoteFrom AAD principle point of view, the service principle of the application is registered in the tenant in the first step. (This configuration should be allowed in AAD – by default this is enabled) and during the admin consent process the service principle gets more permissions granted to it. 

Summary

We achieved both the frictionless experience for the user and allowing administrator to grant the permission when required. The below image summarizes the process.

b5

  • By request IT admin knows the usage of application and it give some light to the usage of such SaaS.
  • By granting access IT admin allows it to the organizational use and removing shadow IT context.
  • If admin rejects the consent the organizational user knows that he’s in Shadow IT context.
  • Blocking of such SaaS may continue based on the organizational policies.


Advertisement

Securing your Azure Web Apps FTP Endpoints

Web Apps are my favorite PaaS offering in Azure. They are simple yet powerful, but the way how Azure handles the Web App FTP Deployment Credentials is not that nifty and better you should know and understand that.

If you find very lazy to read the entire post, you can jump to the summary section to grab the findings.

You can setup FTP Deployment Credentials for your Web App, as most of the developers do this, even though they use fully integrated CI/CD because this is very handy at certain times. You can enable the FTP Deployment Credentials (FDC) for the Web App in the portal under the PUBLISHING section of your Web App.

Click on Deployment credentials and you will see the blade where you can enter the FTP username and password. First I entered a common name (wonder what is it? Bob) and typed my usual password (wonder what is it? **********) and hit Save. I got the below error message. It is very clear that FTP usernames should be unique across all the Azure customers.

Then I entered a username which I assumed no any other Azure customers have taken (wonder what is it? nickiminaj), entered the usual password and hit Save. It worked. I got the success message. So now I can enter my FTP credentials when I browse to the FTP host name of the site. But this FTP Deployment Credential is shared among all your Web App regardless of which resource group or hosting plans or pricing tier or even the subscription they are in. This is generally known as Web Deployment Credentials.

FTP Deployment Credential include a username and the password. This Username is in the following format your Web App name\username and the password. Look at these below images of two different Web Apps from 2 different subscriptions.

CAUTION

So sharing your FTP Deployment Credentials of a Web App leaves you in the danger of exposing access to all your Web Apps the particular Microsoft Account / Azure AD account has access to. This can be disastrous when you share the credentials with third party developers, they only have to guess the name of your other sites to get the full username and they can access your Web Apps simply, since they already know the passwords.

The question is how to generate different FTP credentials for each Web App?

When you set up your Web App, each of it has its own FTP credential assigned by KUDU. KUDU is the project provides infrastructure for the Azure Web Apps. You can get this credential by downloading the Publish Profile of the web site.

Publishing profile is a simple XML file. Open the file and look for the <publishProfile> element where publishMethod attribute with the value of ‘FTP’.

This is credential is known as Site Level Credential of you Web App and only applicable to that particular Web App. Three green dots show the required information.

You cannot set the password but you can simply regenerate the password by clicking the Reset Publish Profile.

You can share this credentials with anyone and they can access only the particular Web App.

Summary

  • FTP Deployment Credential username should be unique across all Azure customers.
  • FTP Deployment Credential username is shared across all the Web Apps the current Microsoft Account has access to, regardless of resource groups, hosting plans, pricing tier and subscription. And the username is common for the Microsoft Account.
  • Each Web App has the FTP Deployment username as WebAppName\username
  • Ex: If you have two Web Apps (webapp1 and webapp2) and if you create the username kevin they will have the FTP deployment username webapp1\kevin and webapp2\kevin respectively, with the same password.
  • You can gain the Site Level Credential for your Web App with the generated username and password uniquely for each Web App from the Publishing Profile

Custom Authorization Filter returns 200 OK during authorization failure in Web API / MVC

This is a very specific and a quick post. In Web APIs sometimes we need to implement custom authorization filter which is extended from AuthorizeAttribute class, this is mainly useful in implementing authorization.

The below code shows how to implement an admin authorization in claims based authentication using ClaimsIdentity

The above code works perfectly in controllers and actions. If you pass ‘true’ to IsAdmin only the authentication requests with the claim IsAdmin true can access the respective controllers or actions.

So when a user who is not an admin tries to access controller / action decorated with the above attribute the client should receive a 401 (Unauthorized) / 403 (Forbidden) reply.

The Problem

But the in Web API you will get a response with status code 200 (OK) with the response body with the following message.

This is not a desirable behavior mainly in APIs because when you make a request from AJAX using any Javascript library, there’s a high probability that they would treat the request as success. You should in cooperate specific client logic to detect this and read the response body JSON message.

And also as API developers we do not prefer this default behavior.

The Solution

The solution is very simple, yet I thought to write a blog on this because in the Internet most of the posts say that this behavior cannot be altered from the API side. But API developers have full control over this behavior. Simply override the HandleUnauthorizedRequest method of the AuthorizeAttribute class.

Now you will get 403 error code as expected with the custom message provided in the Content in the response body.

If it is an MVC application you could do a redirection to the login page.

Acer is not affected from ‘Heartbleed’

This is the email I got from Acer couple of days ago.

image

AES Cryptography

Contains the code for AES encryption and decryption in C#.

   1: public byte [] EncryptText(string plainData)

   2:         {

   3:             RijndaelManaged rij = new RijndaelManaged();

   4:             

   5:             rij.GenerateKey();

   6:             _key = rij.Key;

   7:  

   8:             rij.GenerateIV();

   9:             _intializationVector = rij.IV;

  10:  

  11:             ICryptoTransform encryptor = rij.CreateEncryptor(_key, _intializationVector);

  12:  

  13:             using (MemoryStream msEncrypt = new MemoryStream())

  14:             {

  15:                 using (CryptoStream csEncrypt = new CryptoStream(msEncrypt, encryptor, CryptoStreamMode.Write))

  16:                 {

  17:                     using (StreamWriter swEncrypt = new StreamWriter(csEncrypt))

  18:                     {

  19:                         swEncrypt.Write(plainData);

  20:                     }

  21:  

  22:                     return msEncrypt.ToArray();

  23:                 }

  24:             }

  25:  

  26:         }

  27:  

  28:  

  29:         public string  DecryptText(byte [] encrytedData)

  30:         {

  31:             RijndaelManaged rij = new RijndaelManaged();

  32:  

  33:             ICryptoTransform decryptor = rij.CreateDecryptor(_key, _intializationVector);

  34:  

  35:             using (MemoryStream msDecrypt = new MemoryStream(encrytedData))

  36:             {

  37:                 using (CryptoStream csDecrypt = new CryptoStream(msDecrypt, decryptor, CryptoStreamMode.Read))

  38:                 {

  39:                     using (StreamReader srDecrypt = new StreamReader(csDecrypt))

  40:                     {

  41:                         return srDecrypt.ReadToEnd();

  42:                     }

  43:                 }

  44:             }

  45:         }

  46:         

  47:     }